

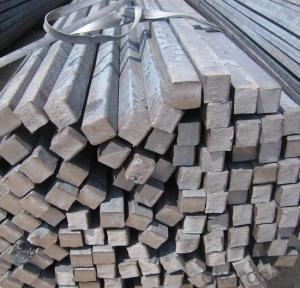
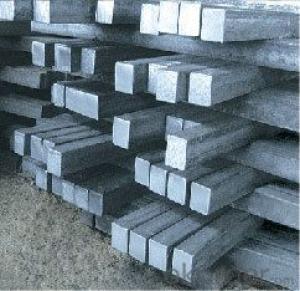
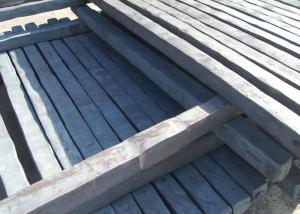
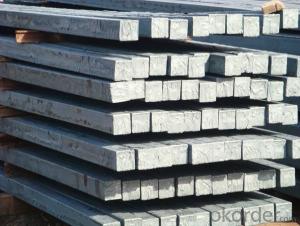
High Quality GB Standard Steel Square Bar 16mm-20mm
- Ref Price:
-

- Loading Port:
- Tianjin
- Payment Terms:
- TT OR LC
- Min Order Qty:
- 25 m.t
- Supply Capability:
- 10000 m.t/month
OKorder Service Pledge
OKorder Financial Service
You Might Also Like


Product Description:
-Standard: GB,
-Grade: Q195 or equivalent.
-Chemical Composition:
Standard | Grade | Element (%) | ||||
GB | Q195 | C | Mn | S | P | Si |
0.06~0.12 | 0.25~0.50 | ≤0.050 | ≤0.045 | ≤0.30 | ||
Measures of HR Square Bar (small measures):

(Section of HR Square Bar)
-Length of a side and Theoretical weight of Square Bar.
Length of a side(mm) | Theoretical weight(kg/m) | Length of a side(mm) | Theoretical weight(kg/m) |
7 | 0.385 | 22 | 3.80 |
8 | 0.502 | 24 | 4.52 |
9 | 0.636 | 25 | 4.91 |
10 | 0.785 | 26 | 5.30 |
11 | 0.950 | 28 | 6.15 |
12 | 1.13 | 30 | 7.06 |
13 | 1.33 | 32 | 8.04 |
14 | 1.54 | 34 | 9.07 |
15 | 1.77 | 36 | 10.17 |
16 | 2.01 | 38 | 11.24 |
17 | 2.27 | 40 | 12.56 |
18 | 2.54 | 42 | 13.85 |
19 | 2.82 | 45 | 15.90 |
20 | 3.14 | 48 | 18.09 |
21 | 3.46 | 50 | 19.63 |
Notes:
1, The theoretical weights in the list, base on the density of 7.85 g/cm3.
2, Formula for theoretical weight of Square bar: (length of a side)2 * 0.00785
3, The numbers with *mean that they are not regular or we don’t offer them.
-Regular length of Square Bar:
Steel | Length of a side (mm) | Length of steel (m) |
Normal steel | < 25 | 4~10 |
> 25 | 3~9 | |
Steel of high quality | All measure | 2~6 |
Tool steel >75 | 1~6 |
Usage/Applications of HR Square Bar:
-The Square Bar is normally used as structure steel.
-Row material for other structure steel like steel angles, channels, I-beams, H-beams, etc…
Packaging & Delivery of HR Square Bar:
-Packing Detail: The products can be packed in bundles by steel wires.
-Marks: We make tag marks and color marks. The tag marks with white background and red company logo will be tied up to each bundle of the products. The information is usually including basic information of products and company and other information requested by customers. As for color marks, we will paint both ends of bundles to make sure that it will be more convenient for customers to distinguish them from other products.
-Delivery Detail: 30~45 working days after receive buyer’s T.T. or L/C.
Transportation:
-The products can be delivered by bulk vessel or by container. As for container, products with the length of 6m will be loaded in 20’ container, with 9m or 12m, in 40’ container.
-The maximum quantity of loading of container is 25 tons.
-The products are usually transported to the nearest port from the production place.
- Q:Can a steel square be used for barn construction?
- Barn construction can indeed make use of a steel square. This versatile and durable tool is capable of performing various tasks within construction, such as layout, marking, and checking right angles. Its utility extends to framing walls, installing rafters, and creating trusses in a barn, ensuring precise measurements and angles. Moreover, steel squares possess resistance to warping and corrosion, rendering them a dependable choice for long-term usage in barn construction. Nevertheless, it is crucial to acknowledge that the particular requirements and regulations for barn construction may differ depending on the location and building codes. Therefore, seeking advice from a professional or local authorities is recommended to guarantee compliance with the necessary standards.
- Q:How do you use a steel square for marking and cutting angled finger joints?
- To use a steel square for marking and cutting angled finger joints, place the square against the edge of the wood and align it with the desired angle. Use a pencil to mark along the edge of the square, creating a straight line. Repeat this process for all the necessary cuts. Then, carefully cut along the marked lines using a saw, ensuring to maintain the angle indicated by the square. The steel square serves as a guide to ensure accurate marking and cutting of angled finger joints.
- Q:How do you use a steel square to measure and mark equal angles?
- To use a steel square to measure and mark equal angles, first align one edge of the square with the reference line or surface. Then, rotate the square until the desired angle is achieved, making sure the other edge of the square remains in contact with the reference line. Once the desired angle is set, use a pencil or a scribe to mark the angle on the workpiece. Repeat the process for each angle required, ensuring the square remains aligned and in contact with the reference line.
- Q:Can a steel square be used for measuring circular objects?
- No, a steel square cannot be used for measuring circular objects. A steel square, also known as a carpenter's square or a framing square, is a tool designed for measuring and marking right angles. It consists of a long straight edge and a shorter perpendicular edge, forming an L-shape. While it can be used for various purposes in carpentry and woodworking, it is not suitable for measuring curves or circular objects. For measuring circular objects, a tool such as a compass, a tape measure, or a set of calipers would be more appropriate.
- Q:Can a steel square be used for cutting angles in woodworking?
- Typically, a steel square is not utilized for cutting angles in woodworking. It is primarily employed for verifying and marking right angles in woodworking projects, also known as a try square or carpenter's square. This tool comprises a handle and a metal blade, specifically designed to ensure precision in joint and corner squareness. In woodworking, specialized tools like miter saws, circular saws, or table saws are commonly utilized for cutting angles. These tools possess adjustable angles and bevels that enable accurate and controlled angle cutting. They offer increased versatility and precision in cutting various angles necessary for woodworking projects. Additionally, specialized jigs and guides can be utilized in conjunction with these tools to further enhance angle cut accuracy and repeatability. Although a steel square can serve as a reference for marking angles, it is not intended to function as a cutting tool itself. Hence, it is advisable to use suitable tools and equipment specifically designed for cutting angles in woodworking projects to achieve optimal outcomes.
- Q:How do you use a steel square to determine the angle of a chamfer cut?
- To determine the angle of a chamfer cut using a steel square, follow these steps: 1. Place the steel square against the edge of the material where the chamfer cut will be made. 2. Align one leg of the square with the flat surface of the material and make sure it is firmly against the edge. 3. Observe the other leg of the square as it extends beyond the material's edge. 4. Read the angle measurement on the scale of the steel square where the extended leg intersects. 5. This angle measurement will give you the precise angle of the chamfer cut, which can be replicated for accurate results.
- Q:Can a steel square be used for checking the squareness of a scroll saw blade?
- No, a steel square cannot be used for checking the squareness of a scroll saw blade. While a steel square is a useful tool for checking the squareness of various woodworking joints and cuts, it is not specifically designed or suitable for assessing the squareness of a scroll saw blade. Scroll saw blades are thin, delicate, and typically made of hardened steel. They have a unique shape and design that differs from the straight edge of a steel square. The blade of a scroll saw is typically curved, allowing for intricate and precise cuts. To check the squareness of a scroll saw blade, it is recommended to use a specialized tool such as a scroll saw blade square or a scroll saw blade alignment jig. These tools are specifically designed for this purpose and provide the appropriate angles and measurements to ensure the blade is aligned correctly. Using a steel square, which is designed for straight edges, may not provide accurate results and could potentially damage or bend the delicate scroll saw blade. It is always best to use the appropriate tools for specific tasks to ensure accurate and safe results.
- Q:How do you use a steel square to lay out a irregular shape with curved sides?
- To use a steel square to lay out an irregular shape with curved sides, you will need to follow these steps: 1. Begin by analyzing the irregular shape and identifying the key points and angles required to construct it accurately. This step is crucial to ensure that your layout is precise. 2. Place the steel square flat on a surface, ensuring that the longer side of the square is perpendicular to the surface. This longer side is called the blade. 3. Align one edge of the steel square, preferably the shorter side known as the tongue, with one of the key points or angles of the irregular shape. Make sure that the blade remains perpendicular to the surface. 4. Trace the edge of the tongue along the curved side of the irregular shape, keeping the blade steady and perpendicular as you move along. 5. Continue tracing the curved sides of the irregular shape, adjusting the position of the steel square as needed to maintain accuracy and ensure a smooth layout. 6. Make sure to take multiple measurements and double-check your work to guarantee precision. This is particularly important when dealing with irregular shapes and curved sides. 7. If necessary, use additional tools like a compass or flexible curve ruler to help you accurately trace the curved sides of the irregular shape. These tools can provide greater flexibility and precision when dealing with curves. Remember, using a steel square to lay out an irregular shape with curved sides can be complex, and it is essential to take your time, measure carefully, and make adjustments as needed to achieve an accurate layout.
- Q:How do you choose the right size of steel square?
- When choosing the right size of steel square, there are several factors to consider. Firstly, you need to determine the purpose for which you will be using the steel square. Different tasks require different sizes of squares. If you are working on smaller projects or intricate measurements, a smaller steel square may be more suitable. On the other hand, if you are working on larger construction projects or need to measure long distances, a larger square would be more appropriate. Secondly, you should consider the size of the materials you will be working with. If you are working with smaller pieces of wood or metal, a smaller square will be easier to handle and provide more accurate measurements. Conversely, larger materials may require a larger square to ensure accurate measurements and proper alignment. Additionally, it is important to consider the level of precision required for your project. If you need highly accurate measurements, a smaller steel square with finer graduations will be more suitable. However, if your project allows for slightly less precision, a larger square with larger graduations may be sufficient. Lastly, you should also take into account your own comfort and ease of use. If you have larger hands or prefer a more substantial tool, a larger steel square may be more comfortable for you to hold and manipulate. In summary, choosing the right size of steel square involves considering the purpose of your project, the size of the materials you will be working with, the level of precision required, and your own comfort and ease of use. By considering these factors, you can select the appropriate size of steel square that will best meet your needs.
- Q:How do you use a steel square to determine angles for window trim?
- To use a steel square to determine angles for window trim, you can follow these steps: 1. Start by measuring the width and height of the window opening using a tape measure. Take note of these measurements. 2. Next, place the steel square against the corner of the window opening, aligning one edge of the square with the side of the window frame. 3. Take a pencil or marker and mark along the edge of the square where it intersects with the top and bottom of the window frame. This creates two lines on the edge of the square. 4. Now, remove the steel square from the window frame and align the marked lines on the square with the corresponding sides on the square's ruler. 5. Look for the angle measurement on the ruler where the other edge of the square intersects. This will give you the angle of the window trim that needs to be cut. 6. Transfer this angle measurement onto the window trim material by using a protractor or an adjustable angle tool to ensure accuracy. Mark the angle on the trim material. 7. Use a miter saw or a handsaw to cut the window trim along the marked angle. Make sure to cut precisely along the marked line. 8. Test the cut trim piece against the window opening to ensure a proper fit. If needed, make any necessary adjustments to the angle by recutting the trim. By using a steel square, you can accurately determine the angles for window trim, allowing for a precise fit and a professional finish.
1. Manufacturer Overview |
|
|---|---|
| Location | |
| Year Established | |
| Annual Output Value | |
| Main Markets | |
| Company Certifications | |
2. Manufacturer Certificates |
|
|---|---|
| a) Certification Name | |
| Range | |
| Reference | |
| Validity Period | |
3. Manufacturer Capability |
|
|---|---|
| a)Trade Capacity | |
| Nearest Port | |
| Export Percentage | |
| No.of Employees in Trade Department | |
| Language Spoken: | |
| b)Factory Information | |
| Factory Size: | |
| No. of Production Lines | |
| Contract Manufacturing | |
| Product Price Range | |
Send your message to us
High Quality GB Standard Steel Square Bar 16mm-20mm
- Ref Price:
-
- Loading Port:
- Tianjin
- Payment Terms:
- TT OR LC
- Min Order Qty:
- 25 m.t
- Supply Capability:
- 10000 m.t/month
OKorder Service Pledge
OKorder Financial Service
Similar products


New products


Hot products


Related keywords

