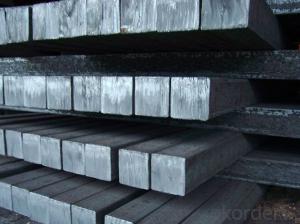


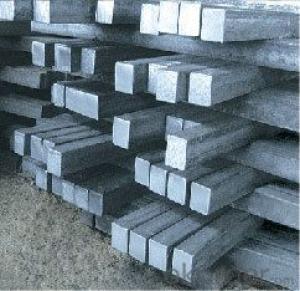
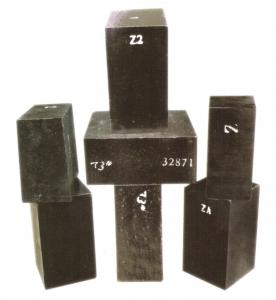
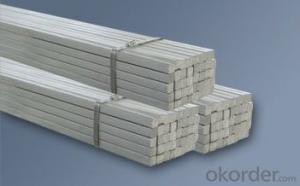
hot rolled square bar
- Ref Price:
-

- Loading Port:
- China Main Port
- Payment Terms:
- TT OR LC
- Min Order Qty:
- -
- Supply Capability:
- -
OKorder Service Pledge
OKorder Financial Service
You Might Also Like


Square Bar Details:
| Minimum Order Quantity: | | Unit: | m.t. | Loading Port: | |
| Supply Ability: | | Payment Terms: | | Package: | loose |
Product Description:
1.Heat the EVA film
2.Cover the heated EVA film on the mould(can be made from wood or aluminum)
3.Spray a coating in a certain baume degree
4.Put on the empty blask
5.Sand-up the flask and vibrate to compaction
Packaging & Delivery
Packaging Details:containers
Delivery Detail:Complete one set of equipment needs for three months
-The length of a side and the theoretical weight of Square Steel.
Length of a side(a, mm) | Theoretical weight(kg/m) | Length of a side(a, mm) | Theoretical weight(kg/m) |
6 | 0.283 | 32 | 8.04 |
7 | 0.385 | *33 | 8.55 |
8 | 0.502 | 34 | 9.07 |
9 | 0.636 | *35 | 9.62 |
10 | 0.785 | 36 | 10.17 |
11 | 0.950 | 38 | 11.24 |
12 | 1.13 | 40 | 12.56 |
13 | 1.33 | 42 | 13.85 |
14 | 1.54 | 45 | 15.90 |
15 | 1.77 | 48 | 18.09 |
16 | 2.01 | 50 | 19.63 |
17 | 2.27 | 53 | 22.05 |
18 | 2.54 | *55 | 23.6 |
19 | 2.82 | 56 | 24.61 |
20 | 3.14 | *58 | 26.4 |
21 | 3.46 | 60 | 28.26 |
22 | 3.80 | 63 | 31.16 |
*23 | 4.15 | *65 | 33.17 |
24 | 4.52 | *68 | 36.3 |
25 | 4.91 | 79 | 38.49 |
26 | 5.30 | 75 | 44.16 |
*27 | 5.72 | 80 | 50.24 |
28 | 6.15 | 85 | 56.72 |
*29 | 6.60 | 90 | 63.59 |
30 | 7.06 | 95 | 70.85 |
*31 | 7.54 | 100 | 78.50 |
Notes:
1, The theoretical weights in the list, base on the density of 7.85 g/cm3.
2, The numbers with *mean that they are not regulars or we don’t offer them.
-The allowed tolerance of Square Steel:
Length of a side(mm) | Allowed Tolerance | ||
Group1 | Group2 | Group3 | |
5.5~7 | ±0.20 | ±0.30 | ±0.40 |
7~20 | ±0.25 | ±0.35 | ±0.40 |
20~30 | ±0.30 | ±0.40 | ±0.50 |
30~50 | ±0.40 | ±0.50 | ±0.60 |
60~80 | ±0.60 | ±0.70 | ±0.80 |
80~110 | ±0.90 | ±1.0 | ±1.1 |
110~150 | ±1.2 | ±1.3 | ±1.1 |
150~190 | ―― | ―― | ±2.0 |
190~250 | ―― | ―― | ±2.5 |
Usage/Applications of Steel Square Bar:
-The Square Steel is normally used as structure steel.
-Row material for other structure steel like steel angles, channels, I-beams, H-beams, etc…
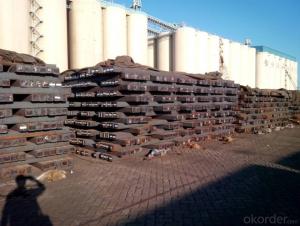
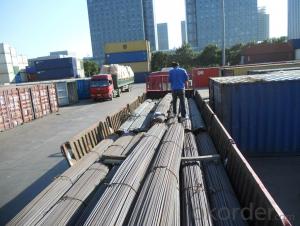
Packaging & Delivery of Steel Square Bar:
-Packing Detail: The products can be packed in bundles by steel wires.
-Marks:
1, Tag marks: the tag marks will be tied up to each bundle of the products. The information is usually including supplier’s logo and name, product name, made in China, products’ specifications, the painted color and other information requested by customers.
2, Color marks: we will paint both ends of the bundles of these products to make sure that they are more evident. It’s will be more convenient for the customers to distinguish them at the destination port.
-Delivery Detail: 30~45 working days after receive buyer’s T.T. or L/C.
Transportation:
-The products can be delivered by bulk vessel or by container. As for container, products with the length of 6m will be loaded in 20’ container, with 9m or 12m, in 40’ container.
-The maximum quantity of loading of container is 25 tons.
-The products usually are transported to the nearest port from the production place.
Payment:
-Invoicing on theoretical weight or actual weight a s customer’s request.
-FOB, CFR or CIF.
-Regular terms of payment:
1, 30% payment in advance, the remaining balance (70% payment) against the copy of B/L.
2, 30% payment in advance, the remaining balance (70% L/C) against the copy of B/L.
3, Negotiable.
- Q:What are the different markings on a steel square and their uses?
- A steel square, also known as a framing square or carpenter's square, is a versatile tool used in woodworking, construction, and metalworking. It typically consists of a long metal blade with markings and a shorter perpendicular blade called the tongue. The different markings on a steel square serve various purposes and allow for accurate measurements, angles, and cuts. Here are some of the most common markings and their uses: 1. Blade Length: The length of the blade is usually marked in inches or centimeters, allowing for quick measurements of length or width. 2. Graduated Scales: These scales are marked along the blade and tongue, often in inches or fractions of an inch. They help measure distances, mark points, and make precise layout work. 3. Rafter Tables: These tables are printed on the blade of the square and provide information for making common rafter cuts, such as determining lengths, angles, and pitches for roof framing. 4. Degree Scale: A steel square may have a protractor-like scale on the tongue, showing degrees from 0 to 90. This scale is used to measure and mark angles accurately, particularly when framing or cutting bevels. 5. Squaring: The most essential feature of a steel square is its ability to check and ensure squareness. The 90-degree angle formed by the blade and tongue allows for accurate right-angled cuts, corner layouts, and squaring of frames and structures. 6. Scribing: Some squares have a scribing notch or hole near the tip of the tongue. This feature allows the square to be used as a marking or scribing gauge, creating parallel lines or transferring measurements onto a workpiece. 7. Level: Some steel squares have a built-in level bubble, indicating whether a surface or object is level or plumb. This feature is useful for leveling shelves, cabinets, or other vertical or horizontal installations. Overall, the different markings on a steel square serve to make measurements, mark points, calculate angles, and ensure accurate and precise cuts in various woodworking and construction applications. The versatility of this tool makes it a favorite among carpenters, woodworkers, and DIY enthusiasts alike.
- Q:Can a steel square be used for checking the squareness of cabinet drawers?
- No, a steel square is not suitable for checking the squareness of cabinet drawers as it is primarily used for measuring and marking right angles in construction and carpentry. For cabinet drawers, a precision square or a combination square would be more appropriate to ensure accurate measurements and squareness.
- Q:How do you use a steel square to find the square footage of a patio?
- To use a steel square to find the square footage of a patio, you need to follow a few steps. First, ensure that the steel square is clean and free from any debris. Next, measure one side of the patio using the long edge of the steel square. Place the steel square against the edge of the patio, aligning the long edge with the side you want to measure. Hold the square firmly in place and make sure it is flush against the edge. Once the square is properly aligned, take note of the measurement indicated on the steel square's short edge. This measurement represents the length of one side of the patio. Repeat the process for the remaining sides of the patio, measuring each side with the steel square. Take note of the measurements for each side. To find the square footage, multiply the length of one side by the length of the adjacent side. For example, if one side measures 10 feet and the adjacent side measures 12 feet, multiply 10 by 12 to get 120 square feet. If the patio has irregular shapes or curves, you can still use the steel square to measure the square footage. Break the patio into smaller sections with straight edges and measure each section individually. Then, add up all the individual measurements to get the total square footage of the patio. Remember to account for any openings or obstacles in your calculations, as you may need to subtract their square footage from the total area. Using a steel square to find the square footage of a patio ensures accuracy and precision in your measurements, helping you determine the right amount of materials needed for your project.
- Q:How do you use a steel square to mark out parallel lines on curved surfaces?
- To use a steel square to mark out parallel lines on curved surfaces, you would first position the square on the curved surface so that one edge of the square is aligned with the desired parallel line. Then, using a pencil or marking tool, you can trace along the edge of the square to create the parallel line. Repeat this process at different points along the curve to mark out multiple parallel lines.
- Q:How do you use a steel square to find the center of an irregular shape?
- To use a steel square to find the center of an irregular shape, you can start by placing the steel square on the shape and aligning one of its edges with a prominent feature or side of the shape. Then, draw a line along the other edge of the square, extending it beyond the shape. Repeat this process by aligning the steel square with another side or feature of the shape and drawing another line. The point where these lines intersect is the approximate center of the irregular shape.
- Q:What are some common techniques for using a steel square in stair building?
- Some common techniques for using a steel square in stair building include measuring and marking the rise and run of each step, determining the angle of the cuts for stringers, and ensuring the steps are level and square by using the square as a guide. Additionally, the square can be used to check the levelness of the landing and to ensure that the stair treads and risers are cut accurately.
- Q:How do you use a steel square for measuring stairs rise and run?
- In order to measure the rise and run of stairs using a steel square, a series of steps must be followed. To begin, the desired measurements for the rise and run of the stairs must be determined. The rise refers to the height between each step, while the run represents the depth or length of each step. Following that, the steel square should be placed on the edge of the stair tread. The shorter arm of the square should be aligned with the riser, and the longer arm should be aligned with the tread. The square should be adjusted until the edge of the longer arm rests on the front edge of the tread, and the shorter arm reaches the desired height of the riser. It is important to ensure that the square is level and properly aligned with the stair. Once the square is properly positioned, the riser and tread should be marked along the edges of the square's arms. This will provide precise measurements for the rise and run of the stairs. This process should be repeated for each step, ensuring that consistent measurements are maintained throughout the entire staircase. Finally, a measuring tape or ruler should be used to confirm the accuracy of the measurements and make any necessary adjustments. Using a steel square for measuring stairs rise and run offers a dependable and precise approach to ensure uniform step dimensions. It aids in the creation of safe and comfortable stairs that adhere to building codes and regulations.
- Q:Can a steel square be used for tile installation?
- Tile installation can indeed make use of a steel square. Known also as a framing square or carpenter's square, this versatile tool is commonly employed in construction and carpentry. Although not specifically designed for tile installation, it can still prove quite beneficial in this regard. A primary function of the steel square is to guarantee precise measurements and angles. This is particularly crucial when it comes to installing tiles, as they require perfect alignment for a professional outcome. The steel square can be employed to measure and mark straight lines, right angles, and the various angles necessary for tile cuts. Additionally, the steel square can serve as a straightedge or guide during tile cutting. By positioning the square against the tile, it can help ensure a straight and even cut. This proves especially useful when executing diagonal or angled cuts. However, it is important to note that the steel square is not specifically tailored for tile installation and may lack certain features required for the task. For instance, it may lack the notches or guides typically present in tile-specific tools. Therefore, while the steel square can be utilized and is often found in the toolkits of many professionals, it may not be the most ideal or specialized tool for tile installation. To conclude, while a steel square can be employed in tile installation and provide valuable assistance in measurement, marking, and cutting, it is advisable to also possess specialized tile tools to ensure optimal results.
- Q:How do you use a steel square to check for flatness?
- In order to check for flatness using a steel square, there are a few straightforward steps that must be followed. The first step entails ensuring that the steel square is clean and devoid of any dirt or debris that could potentially impact the accuracy of the measurement. Following this, position the steel square on the surface that is to be examined for flatness. It is essential to ensure that the square is placed in a manner that covers a significant portion of the surface area. Once the steel square is in position, carefully observe the contact between the square and the surface. If the surface is indeed flat, the steel square will make full and even contact with the surface along its entire length. There should be no gaps or deviations between the square and the surface. On the other hand, if the surface is not flat, you will notice gaps or deviations between the steel square and the surface. These gaps serve as indicators of areas where the surface is not level or flat. To determine the extent of the flatness issue, it is advisable to move the steel square along different parts of the surface and repeat the observation. This will aid in identifying any localized areas of unevenness or irregularities. All in all, using a steel square to check for flatness is a method that is both simple and effective. It enables a quick assessment of surface flatness and facilitates the identification of any discrepancies. By doing so, it guarantees that workpieces or projects are constructed on a level and even foundation, thereby promoting accuracy and precision.
- Q:How do you use a steel square to find roof pitch?
- In order to determine the roof pitch using a steel square, a series of straightforward steps must be followed. First and foremost, it is imperative to ensure that the steel square is properly calibrated and in excellent condition. Afterward, position the square on the roof in such a manner that the long edge of the square aligns with the bottom edge of the roof. It is essential to guarantee that the square is level and securely placed. Once the square is in position, utilize a level to ascertain that it is perfectly horizontal. This will facilitate obtaining precise measurements. At this point, examine the markings on the square. One of the arms of the square will feature a pitch scale that represents the roof pitch in either inches per foot or degrees. Align the scale on the square with the bottom edge of the roof and observe the corresponding pitch measurement on the scale. This measurement will indicate the degree of steepness of the roof pitch. It is important to bear in mind that the measurements on the steel square are standardized. Consequently, they can be easily compared to building codes or other references to determine if the roof pitch falls within acceptable limits. Utilizing a steel square is an uncomplicated and dependable method for determining the roof pitch. This enables individuals to accurately assess the slope of the roof and make well-informed decisions when it comes to repairs or construction projects.
1. Manufacturer Overview |
|
|---|---|
| Location | |
| Year Established | |
| Annual Output Value | |
| Main Markets | |
| Company Certifications | |
2. Manufacturer Certificates |
|
|---|---|
| a) Certification Name | |
| Range | |
| Reference | |
| Validity Period | |
3. Manufacturer Capability |
|
|---|---|
| a)Trade Capacity | |
| Nearest Port | |
| Export Percentage | |
| No.of Employees in Trade Department | |
| Language Spoken: | |
| b)Factory Information | |
| Factory Size: | |
| No. of Production Lines | |
| Contract Manufacturing | |
| Product Price Range | |
Send your message to us
hot rolled square bar
- Ref Price:
-
- Loading Port:
- China Main Port
- Payment Terms:
- TT OR LC
- Min Order Qty:
- -
- Supply Capability:
- -
OKorder Service Pledge
OKorder Financial Service
Similar products


New products
Hot products


Related keywords

