
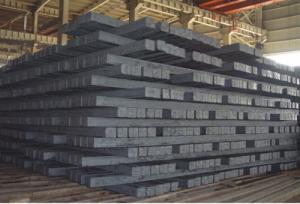
Q195 Square bar square bar for construction
- Ref Price:
-

- Loading Port:
- Shanghai
- Payment Terms:
- TT or LC
- Min Order Qty:
- 10000 m.t.
- Supply Capability:
- 100000 m.t./month
OKorder Service Pledge
OKorder Financial Service
You Might Also Like


Product Description:
OKorder is offering Q195 Square Bar square Bar for construction at great prices with worldwide shipping. Our supplier is a world-class manufacturer of steel, with our products utilized the world over. OKorder annually supplies products to European, North American and Asian markets. We provide quotations within 24 hours of receiving an inquiry and guarantee competitive prices.
Product Applications:
Q195 Square Bar square Bar for construction are ideal for structural applications and are widely used in the construction of buildings and bridges, and the manufacturing, petrochemical, and transportation industries.
Product Advantages:
OKorder's Square Bar are durable, strong, and resist corrosion.
Main Product Features:
· Premium quality
· Prompt delivery & seaworthy packing (30 days after receiving deposit)
· Corrosion resistance
· Can be recycled and reused
· Mill test certification
· Professional Service
· Competitive pricing
Product Specifications:
We offer Square Steel Bar with grade Q195 / Q235
Specifications of Square Steel Bar:
-Standard: GB,
-Grade: Q195/Q235 or equivalent.
Chemical Composition:
-Chemical Composition. Q195
Standard | Grade | Element (%) | ||||
GB | Q195 | C | Mn | S | P | Si |
0.06~0.12 | 0.25~0.50 | ≤0.050 | ≤0.045 | ≤0.30 | ||
-Chemical Composition. Q235
Standard | Grade | Element (%) | ||||
GB | Q235B | C | Mn | S | P | Si |
0.12~0.20 | 0.30~0.70 | ≤0.045 | ≤0.045 | ≤0.30 | ||
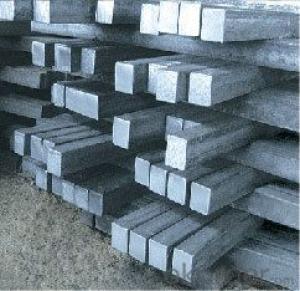
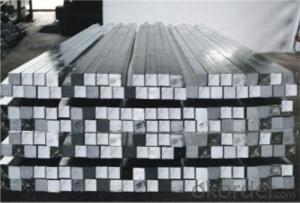
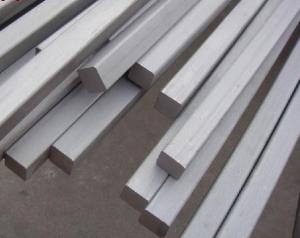
Measures and Tolerances of Square Steel Bar:

(The section of Square Steel Bar)
-The length of a side and the theoretical weight of Square Steel.
Length of a side(a, mm) | Theoretical weight(kg/m) | Length of a side(a, mm) | Theoretical weight(kg/m) |
6 | 0.283 | 32 | 8.04 |
7 | 0.385 | *33 | 8.55 |
8 | 0.502 | 34 | 9.07 |
9 | 0.636 | *35 | 9.62 |
10 | 0.785 | 36 | 10.17 |
11 | 0.950 | 38 | 11.24 |
12 | 1.13 | 40 | 12.56 |
13 | 1.33 | 42 | 13.85 |
14 | 1.54 | 45 | 15.90 |
15 | 1.77 | 48 | 18.09 |
16 | 2.01 | 50 | 19.63 |
17 | 2.27 | 53 | 22.05 |
18 | 2.54 | *55 | 23.6 |
19 | 2.82 | 56 | 24.61 |
20 | 3.14 | *58 | 26.4 |
21 | 3.46 | 60 | 28.26 |
22 | 3.80 | 63 | 31.16 |
*23 | 4.15 | *65 | 33.17 |
24 | 4.52 | *68 | 36.3 |
25 | 4.91 | 79 | 38.49 |
26 | 5.30 | 75 | 44.16 |
*27 | 5.72 | 80 | 50.24 |
28 | 6.15 | 85 | 56.72 |
*29 | 6.60 | 90 | 63.59 |
30 | 7.06 | 95 | 70.85 |
*31 | 7.54 | 100 | 78.50 |
Notes:
1, The theoretical weights in the list, base on the density of 7.85 g/cm3.
2, The numbers with *mean that they are not regulars or we don’t offer them.
-The allowed tolerance of Square Steel:
Length of a side(mm) | Allowed Tolerance | ||
Group1 | Group2 | Group3 | |
5.5~7 | ±0.20 | ±0.30 | ±0.40 |
7~20 | ±0.25 | ±0.35 | ±0.40 |
20~30 | ±0.30 | ±0.40 | ±0.50 |
30~50 | ±0.40 | ±0.50 | ±0.60 |
60~80 | ±0.60 | ±0.70 | ±0.80 |
80~110 | ±0.90 | ±1.0 | ±1.1 |
110~150 | ±1.2 | ±1.3 | ±1.1 |
150~190 | ―― | ―― | ±2.0 |
190~250 | ―― | ―― | ±2.5 |
Usage/Applications of Steel Square Bar:
-The Square Steel is normally used as structure steel.
-Row material for other structure steel like steel angles, channels, I-beams, H-beams, etc…
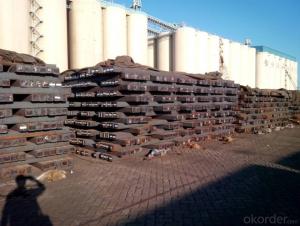
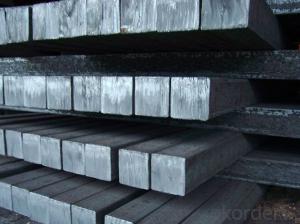
Packaging & Delivery of Steel Square Bar:
-Packing Detail: The products can be packed in bundles by steel wires.
-Marks:
1, Tag marks: the tag marks will be tied up to each bundle of the products. The information is usually including supplier’s logo and name, product name, made in China, products’ specifications, the painted color and other information requested by customers.
2, Color marks: we will paint both ends of the bundles of these products to make sure that they are more evident. It’s will be more convenient for the customers to distinguish them at the destination port.
-Delivery Detail: 30~45 working days after receive buyer’s T.T. or L/C.
FAQ:
Q1: What makes stainless steel stainless?
A1: Stainless steel must contain at least 10.5 % chromium. It is this element that reacts with the oxygen in the air to form a complex chrome-oxide surface layer that is invisible but strong enough to prevent further oxygen from "staining" (rusting) the surface. Higher levels of chromium and the addition of other alloying elements such as nickel and molybdenum enhance this surface layer and improve the corrosion resistance of the stainless material.
Q2: Can stainless steel rust?
A2: Stainless does not "rust" as you think of regular steel rusting with a red oxide on the surface that flakes off. If you see red rust it is probably due to some iron particles that have contaminated the surface of the stainless steel and it is these iron particles that are rusting. Look at the source of the rusting and see if you can remove it from the surface.


- Q:How do you use a steel square to measure and mark acute angles?
- In order to measure and mark acute angles using a steel square, there are a few simple steps that need to be followed. Firstly, it is important to make sure that the steel square is clean and properly calibrated. This will guarantee precise measurements and markings. Next, securely place one edge of the steel square along the baseline where the angle is to be measured. It is crucial to ensure that the square does not move during the process. Following that, locate the angle scale on the steel square. This scale typically consists of various numbers and lines that represent different angles. Identify the acute angle that needs to be measured on the angle scale. Acute angles are those that are less than 90 degrees. Once the correct angle has been identified, make a mark on the baseline at the corresponding line or number on the scale. This mark will act as the starting point for measuring the angle. Subsequently, draw a line extending from the mark made on the baseline, parallel to one of the edges of the square. Lastly, measure the desired length of the acute angle from the mark on the baseline. To ensure accuracy, a ruler or measuring tape can be used. Once the length has been measured, mark the endpoint on the drawn line. By following these steps, accurate measurements and markings of acute angles can be achieved using a steel square. It is important to always double-check measurements and utilize the correct angle scale on the square to achieve precise results.
- Q:Can a steel square be used for measuring and marking rip cuts?
- Measuring and marking rip cuts can be done using a steel square. In woodworking and construction, a steel square is a tool that is both versatile and reliable. It consists of a long arm and a shorter arm that meet at a 90-degree angle, facilitating precise measurements and markings. When employed for rip cuts, the long arm of the steel square can be pressed against the material's edge, guaranteeing a straight and accurate line. The shorter arm can then be utilized to indicate the desired width of the rip cut, serving as a clear guide for the saw or cutting tool. All in all, a steel square is an invaluable tool for the measurement and marking of rip cuts, ensuring accuracy and consistency in woodworking projects.
- Q:Can a steel square be used for checking the alignment of a door frame?
- The alignment of a door frame can be checked using a steel square. This versatile tool, also called a framing square or carpenter's square, is commonly used in carpentry and woodworking. It consists of a blade and a tongue, which are joined at a 90-degree angle. To ensure that the door frame is aligned properly, the steel square can be placed against the frame's edges. This will verify if they are perfectly perpendicular to each other, which is crucial for a proper fit and smooth functionality of the door. Moreover, the steel square can be used to check other aspects of the door frame's alignment, such as the squareness of its corners. By positioning the square in the corners, it becomes easy to determine if they are properly aligned or if adjustments are necessary. All in all, the steel square is a dependable and widely used tool for checking the alignment of a door frame and ensuring its correct installation.
- Q:Can a steel square be used for checking the plumbness of a wall stud?
- No, a steel square cannot be used for checking the plumbness of a wall stud. A steel square, also known as a carpenter's square, is mainly used for measuring and marking right angles in woodworking projects. It is not designed or calibrated for checking plumbness. To check the plumbness of a wall stud, a level or plumb bob is typically used. These tools are specifically designed to ensure vertical alignment and are more accurate for this particular task.
- Q:How do you use a steel square for marking tenon and mortise joints?
- To use a steel square for marking tenon and mortise joints, you need to follow a few steps. Firstly, ensure you have a steel square with clear and accurate markings on it. Next, take the piece of wood you want to mark, and position it in the desired orientation for your joint. Place one end of the steel square against the edge of the wood, aligning it with the face or end of the wood depending on the type of joint you are making. Once the square is properly positioned, use a pencil or marking knife to trace along the edge of the square onto the wood. This will create a straight and precise line, allowing you to accurately cut or chisel out the mortise or tenon. For marking tenon joints, you will need to flip the wood and repeat the process on the other end. Make sure to align the square with the previously marked line to ensure consistency and accuracy. Additionally, the steel square can also be used to mark the depth of the mortise or tenon. By sliding the square along the length of the wood, you can mark the desired depth on the side of the wood using the square's markings. Overall, using a steel square for marking tenon and mortise joints is a simple yet effective method to ensure precise and clean joints. It helps to maintain the integrity of the joint and ensures a strong and durable connection between the two pieces of wood.
- Q:How do you use a steel square to measure and mark 213.75-degree angles?
- To use a steel square to measure and mark a 213.75-degree angle, you would follow these steps: 1. Begin by aligning the long edge of the steel square with the reference line or surface where you want to create the angle. Ensure that the square is firmly held in place to prevent any movement during the marking process. 2. Locate the 0-degree mark on the steel square, which is typically found at the intersection of the long edge and the shorter perpendicular edge. Make sure this mark is lined up precisely with the reference line or surface. 3. Next, identify the degree scale on the steel square. This scale usually ranges from 0 to 90 degrees, with increments of 1 or 2 degrees marked along the edge of the square. 4. To measure a 213.75-degree angle, start by aligning the 0-degree mark with the reference line or surface. Then, move your gaze along the degree scale until you reach the 213.75-degree marking. This marking may not always be explicitly labeled, so you may need to estimate the position between two marked degrees. 5. Once you have located the correct degree measurement, make a small mark or notch at that point on the reference line or surface using a pencil or any other suitable marking tool. This mark will indicate the desired angle. 6. Finally, use a straight edge or a ruler to connect the marked point with the reference line or surface, creating the 213.75-degree angle. Remember, precision is crucial when using a steel square to measure and mark angles. Ensure that the square remains securely in place and take your time to accurately locate the desired degree measurement.
- Q:How do you use a steel square to measure and mark 303.75-degree angles?
- In order to measure and mark angles of 303.75 degrees using a steel square, the first step would be to align one edge of the square with the starting point of the desired angle. Then, the square should be rotated until the other edge aligns with the intended endpoint of the angle. Given that a steel square typically includes markings for 90-degree angles and their respective complements (45 and 135 degrees), it may not have a specific marking for a 303.75-degree angle. Nevertheless, an estimation of the angle can still be made by utilizing the available markings on the square. For instance, the alignment process can begin by matching the 90-degree marking on the square with the starting point of the angle. Then, the position of the other edge of the square should be observed. If it aligns with the 45-degree marking, it can be estimated that the angle is approximately 135 degrees (90 + 45). To further refine the measurement, the remaining angle of 168.75 degrees can be divided into two equal parts. The square should be aligned with the endpoint of the angle, and the halfway point should be marked. This will result in an estimate of a 303.75-degree angle. It is important to note that this method may not yield an exact measurement, but it can assist in approximating and marking the desired angle when employing a steel square.
- Q:How do you use a steel square to lay out a valley rafter?
- To lay out a valley rafter, one must follow the following steps: 1. Begin by determining the pitch of the roof, which is the ratio of the rise to the run. Typically presented as a fraction like 6/12 or 8/12. 2. Place the steel square on a flat surface, ensuring that the long edge is facing up and the shorter edge is pointing towards you. 3. Locate the line on the blade that corresponds to the roof pitch, often labeled with the pitch ratio. For instance, if the pitch is 6/12, locate the line labeled "6" on the blade. 4. Position the steel square onto the valley rafter stock, aligning the tongue with the rafter's edge. 5. Trace along the edge of the tongue to mark the plumb cut, representing the cut that will fit against the ridge board at the top of the rafter. 6. Proceed to trace along the edge of the blade to mark the bird's mouth cut, signifying the cut that will fit against the wall or supporting structure at the bottom of the rafter. 7. Measure and mark the length of the rafter from the plumb cut to the bird's mouth cut. 8. Repeat these steps for the opposite side of the valley rafter if necessary. 9. Finally, use a saw to accurately and precisely cut along the marked lines. By employing a steel square for laying out a valley rafter, one can ensure that the cuts are appropriately aligned, resulting in a secure fit and contributing to a structurally sound and visually appealing roof.
- Q:How do you use a steel square for determining the center of a circle?
- To use a steel square for determining the center of a circle, you can follow these steps: 1. Begin by drawing a straight line across the circle's diameter using the steel square. Place the square on the circle's edge, ensuring that it intersects the center of the circle. 2. Make a mark where the straight line intersects the circle on both sides. These marks will serve as reference points. 3. Rotate the steel square and place it on the circle's edge again, aligning one of the square's edges with one of the reference points you just marked. 4. Draw a second straight line across the diameter of the circle, intersecting the center and the other reference point. 5. The point where the two lines intersect is the center of the circle. You can mark this point or use it as a reference for further measurements or constructions. Using a steel square for determining the center of a circle provides a precise and accurate method, ensuring that your measurements are consistent and reliable.
- Q:How do you use a steel square to measure stair treads and risers?
- To use a steel square to measure stair treads and risers, you would typically place the square's blade against the tread and the tongue against the riser. By aligning the square properly, you can easily read the measurements marked on the square to determine the dimensions of the stair treads and risers accurately.
1. Manufacturer Overview |
|
|---|---|
| Location | |
| Year Established | |
| Annual Output Value | |
| Main Markets | |
| Company Certifications | |
2. Manufacturer Certificates |
|
|---|---|
| a) Certification Name | |
| Range | |
| Reference | |
| Validity Period | |
3. Manufacturer Capability |
|
|---|---|
| a)Trade Capacity | |
| Nearest Port | |
| Export Percentage | |
| No.of Employees in Trade Department | |
| Language Spoken: | |
| b)Factory Information | |
| Factory Size: | |
| No. of Production Lines | |
| Contract Manufacturing | |
| Product Price Range | |
Send your message to us
Q195 Square bar square bar for construction
- Ref Price:
-
- Loading Port:
- Shanghai
- Payment Terms:
- TT or LC
- Min Order Qty:
- 10000 m.t.
- Supply Capability:
- 100000 m.t./month
OKorder Service Pledge
OKorder Financial Service
Similar products


New products
Hot products


Related keywords

