


hor rolled steel billet
- Ref Price:
-

- Loading Port:
- China Main Port
- Payment Terms:
- TT OR LC
- Min Order Qty:
- -
- Supply Capability:
- -
OKorder Service Pledge
OKorder Financial Service
You Might Also Like


Product Description:
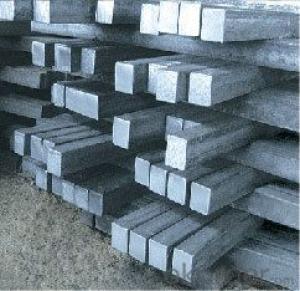
We offer Square Steel Bar with grade Q195 / Q235
Specifications of Square Steel Bar:
-Standard: GB,
-Grade: Q195/Q235 or equivalent.
Chemical Composition:
-Chemical Composition. Q195
Standard | Grade | Element (%) | ||||
GB | Q195 | C | Mn | S | P | Si |
0.06~0.12 | 0.25~0.50 | ≤0.050 | ≤0.045 | ≤0.30 | ||
-Chemical Composition. Q235
Standard | Grade | Element (%) | ||||
GB | Q235B | C | Mn | S | P | Si |
0.12~0.20 | 0.30~0.70 | ≤0.045 | ≤0.045 | ≤0.30 | ||
Measures and Tolerances of Square Steel Bar:

(The section of Square Steel Bar)
-The length of a side and the theoretical weight of Square Steel.
Length of a side(a, mm) | Theoretical weight(kg/m) | Length of a side(a, mm) | Theoretical weight(kg/m) |
6 | 0.283 | 32 | 8.04 |
7 | 0.385 | *33 | 8.55 |
8 | 0.502 | 34 | 9.07 |
9 | 0.636 | *35 | 9.62 |
10 | 0.785 | 36 | 10.17 |
11 | 0.950 | 38 | 11.24 |
12 | 1.13 | 40 | 12.56 |
13 | 1.33 | 42 | 13.85 |
14 | 1.54 | 45 | 15.90 |
15 | 1.77 | 48 | 18.09 |
16 | 2.01 | 50 | 19.63 |
17 | 2.27 | 53 | 22.05 |
18 | 2.54 | *55 | 23.6 |
19 | 2.82 | 56 | 24.61 |
20 | 3.14 | *58 | 26.4 |
21 | 3.46 | 60 | 28.26 |
22 | 3.80 | 63 | 31.16 |
*23 | 4.15 | *65 | 33.17 |
24 | 4.52 | *68 | 36.3 |
25 | 4.91 | 79 | 38.49 |
26 | 5.30 | 75 | 44.16 |
*27 | 5.72 | 80 | 50.24 |
28 | 6.15 | 85 | 56.72 |
*29 | 6.60 | 90 | 63.59 |
30 | 7.06 | 95 | 70.85 |
*31 | 7.54 | 100 | 78.50 |
Notes:
1, The theoretical weights in the list, base on the density of 7.85 g/cm3.
2, The numbers with *mean that they are not regulars or we don’t offer them.
-The allowed tolerance of Square Steel:
Length of a side(mm) | Allowed Tolerance | ||
Group1 | Group2 | Group3 | |
5.5~7 | ±0.20 | ±0.30 | ±0.40 |
7~20 | ±0.25 | ±0.35 | ±0.40 |
20~30 | ±0.30 | ±0.40 | ±0.50 |
30~50 | ±0.40 | ±0.50 | ±0.60 |
60~80 | ±0.60 | ±0.70 | ±0.80 |
80~110 | ±0.90 | ±1.0 | ±1.1 |
110~150 | ±1.2 | ±1.3 | ±1.1 |
150~190 | ―― | ―― | ±2.0 |
190~250 | ―― | ―― | ±2.5 |
Usage/Applications of Steel Square Bar:
-The Square Steel is normally used as structure steel.
-Row material for other structure steel like steel angles, channels, I-beams, H-beams, etc…
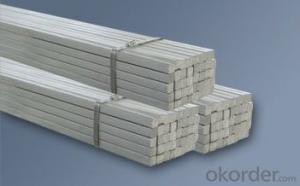
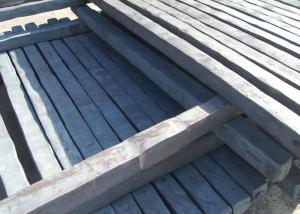
Packaging & Delivery of Steel Square Bar:
-Packing Detail: The products can be packed in bundles by steel wires.
-Marks:
1, Tag marks: the tag marks will be tied up to each bundle of the products. The information is usually including supplier’s logo and name, product name, made in China, products’ specifications, the painted color and other information requested by customers.
2, Color marks: we will paint both ends of the bundles of these products to make sure that they are more evident. It’s will be more convenient for the customers to distinguish them at the destination port.
-Delivery Detail: 30~45 working days after receive buyer’s T.T. or L/C.
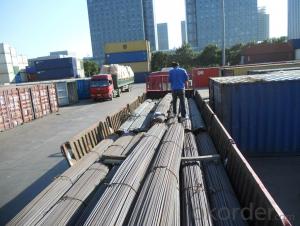
Transportation:
-The products can be delivered by bulk vessel or by container. As for container, products with the length of 6m will be loaded in 20’ container, with 9m or 12m, in 40’ container.
-The maximum quantity of loading of container is 25 tons.
-The products usually are transported to the nearest port from the production place.
Payment:
-Invoicing on theoretical weight or actual weight a s customer’s request.
-FOB, CFR or CIF.
-Regular terms of payment:
1, 30% payment in advance, the remaining balance (70% payment) against the copy of B/L.
2, 30% payment in advance, the remaining balance (70% L/C) against the copy of B/L.
3, Negotiable.
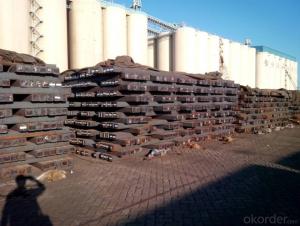
Photos of Square Steel Bar:

- Q:Can a steel square be used for marking out finger joints?
- Yes, a steel square can be used for marking out finger joints. A steel square is a versatile and precise tool commonly used in woodworking and carpentry. It has a 90-degree angle and a ruler along its edge, making it perfect for marking out straight lines and angles. When making finger joints, accuracy is crucial to ensure a proper fit. A steel square can be used to mark the lines and angles needed to create the joints, allowing for precise and clean cuts. However, it is important to note that finger joints require precise measurements and layout, so it is recommended to use a dedicated finger joint jig or a dado blade on a table saw for the best results.
- Q:How do you use a steel square to ensure the correct angle for a half-lap joint?
- To use a steel square to ensure the correct angle for a half-lap joint, follow these steps: 1. Start by marking the desired depth of the half-lap joint on both pieces of wood that will be joined together. This can be done by measuring and marking the depth on the edge of each piece. 2. Place the steel square on the end of one of the pieces of wood, aligning it with the edge and ensuring that the inside corner of the square is facing towards the end of the wood. 3. Use a pencil or a marking knife to trace along the inside edge of the steel square. This will create a straight and square line across the end of the wood. 4. Repeat the process on the other piece of wood, making sure the lines are aligned when the two pieces are placed together. 5. Now, you can use a handsaw or a chisel to remove the material between the lines on both pieces of wood. Make sure to cut along the lines accurately to achieve a tight and precise fit. By using a steel square to mark the lines, you can ensure that the angles of the half-lap joint are correct and the joint will fit together accurately. The steel square acts as a guide to create straight and square lines, making it easier to achieve the desired angle for the joint.
- Q:How do you use a steel square to lay out a compound miter cut?
- In order to lay out a compound miter cut using a steel square, you must follow a series of steps. Firstly, it is crucial to have a clear understanding of what exactly a compound miter cut entails. Essentially, it involves both an angle and a bevel. This implies that the saw blade must be tilted and angled simultaneously in order to achieve the desired cut. The next step involves gathering the necessary tools, which include a steel square, a pencil, and a measuring tape. It may also prove beneficial to have a miter saw or a compound miter saw available for the actual cutting process. To commence, you must determine the angle at which the cut needs to be made. This can be accomplished by referring to the project plans or by measuring the angle directly on the workpiece. Once the angle has been established, proceed to loosen the bevel adjustment on your miter saw and set it to the desired angle. At this point, take the steel square and position one edge against the face of the workpiece. Ensure that it is flush and straight before marking the desired cut line on the workpiece using a pencil. To ascertain the bevel angle, place the steel square against the edge of the workpiece, aligning one leg with the face and the other leg with the edge. Once again, verify that the square is flush and straight. Following this, draw a line along the other leg of the square. The intersection of these two lines represents the desired cut line for your compound miter cut. Before proceeding, it is essential to recheck your measurements and angles. Finally, carefully adjust the bevel angle on your miter saw to match the line you have just drawn. Secure the workpiece firmly in place and proceed to make the compound miter cut. Always prioritize safety when utilizing power tools. Wear appropriate protective gear, adhere to the manufacturer's instructions for your specific saw model, and take all necessary precautions to prevent accidents.
- Q:Can a steel square be used for marking out half-blind dovetail joints?
- Yes, a steel square can be used for marking out half-blind dovetail joints.
- Q:How do you maintain and care for a steel square?
- To maintain and care for a steel square, there are a few steps you can follow. 1. Clean regularly: After each use, make sure to remove any debris, dust, or moisture from the steel square. You can use a brush or a cloth to wipe it down and ensure it is free from any dirt or grime. 2. Lubricate the moving parts: Steel squares often have sliding parts that need to move smoothly. Apply a small amount of lubricant to these areas to keep them working properly. Be sure to use a lubricant that is suitable for metal surfaces. 3. Store properly: When not in use, store the steel square in a dry and clean place. Avoid exposing it to extreme temperatures or humidity, as this can cause corrosion or damage to the metal. 4. Check for rust: Regularly inspect the steel square for any signs of rust. If you notice any rust spots, gently clean them with a wire brush or steel wool. Afterward, apply a rust inhibitor or a light coat of oil to prevent further rusting. 5. Avoid dropping or mishandling: Steel squares are durable, but they can still get damaged if mishandled or dropped. Be careful when using and storing them to prevent any accidental damage. 6. Calibration: Over time, it is possible for the measurements on a steel square to become inaccurate. To ensure its precision, you can periodically check its accuracy using a reliable measuring tool. If any adjustments are required, follow the manufacturer's instructions or seek professional help. By following these steps, you can maintain and care for your steel square, prolonging its lifespan and ensuring its accuracy for various tasks and projects.
- Q:Can a steel square be used for measuring the pitch of a roof?
- Yes, a steel square can be used for measuring the pitch of a roof. A steel square, also known as a framing square or carpenter's square, is a versatile tool used by carpenters and roofers for various measurements and calculations. To measure the pitch of a roof, you can use the square's graduated scales and angles to determine the angle and slope of the roof. By placing the square on the roof's surface and aligning it with the rafters or trusses, you can easily determine the pitch by reading the scale or using the square's built-in formulas. However, it is important to note that using a steel square may not provide the most accurate measurements for complex or irregular roof shapes, and specialized roofing tools or instruments may be more suitable in those cases.
- Q:How do you use a steel square for creating precise tongue and groove joints?
- To use a steel square for creating precise tongue and groove joints, you need to follow a few steps: 1. Measure and mark the thickness of the timber you will be working with. This will help you determine the size of the tongue and groove joints you need to create. 2. Use the steel square to mark the layout of the joint on both the edge and face of the timber. Place the square against the edge of the timber and align it with the marked thickness line. Use a pencil or knife to make the necessary markings. 3. For creating the tongue, position the square against the edge of the timber and align it with the marked layout line. Use the square as a guide to make multiple parallel lines across the width of the timber. These lines will define the width and depth of the tongue. 4. Next, for creating the groove, position the square against the face of the timber and align it with the marked layout line. Use the square to make parallel lines across the width of the timber. These lines will define the width and depth of the groove. 5. Use a chisel or router to remove the waste material for both the tongue and groove. Start by making several cuts along the marked lines for the tongue, and then use a chisel to remove the waste in between the cuts. Repeat the process for the groove, making several cuts along the marked lines and chiseling away the waste. 6. Once the tongue and groove joints are cut, test-fit them together to ensure they align perfectly and create a snug fit. Make any necessary adjustments by further chiseling or trimming until the joints fit precisely. Using a steel square for creating tongue and groove joints helps you maintain accuracy and consistency in the size and alignment of the joints. It provides a reliable guide for marking the layout and ensures that the resulting joints fit together tightly, creating strong and professional-looking connections.
- Q:How do you use a steel square to find the center of a board?
- To use a steel square to find the center of a board, you can follow these steps: 1. Place the steel square on one end of the board, aligning the long side of the square with the edge of the board. 2. Make sure the square is perfectly perpendicular to the edge of the board. 3. Mark a reference line on the board along the long side of the square. 4. Without moving the square, place the opposite end of the steel square against the reference line you just marked. 5. Slide the square along the reference line until the short side of the square intersects with the other edge of the board. 6. Mark another reference line on the board along the short side of the square. 7. Without moving the square, place the opposite end of the steel square against the new reference line you just marked. 8. Slide the square along the reference line until the long side of the square intersects with the first edge of the board. 9. Mark a final reference line on the board along the long side of the square. 10. The point where the three reference lines intersect is the center of the board. Using a steel square helps ensure accurate measurements and straight lines, making it an effective tool for finding the center of a board.
- Q:How do you use a steel square to find angles for compound bevel mitered corners?
- To use a steel square to find angles for compound bevel mitered corners, you would start by measuring and marking the length of each side of the corner on the respective pieces of material. Then, place the steel square against one of the pieces with the 90-degree angle aligned with the edge. Next, adjust the square to align with the other piece by rotating it until the desired angle is achieved. Finally, mark the angle on both pieces using the square as a guide, and cut accordingly.
- Q:Can a steel square be used for deck stair layout and construction?
- Deck stair layout and construction can benefit greatly from the use of a steel square. Also known as a framing square or carpenter's square, this versatile tool is widely used in woodworking and construction. With its long and short arms forming a right angle, the steel square serves various purposes. Specifically for deck stair layout and construction, the steel square proves to be highly advantageous. It aids in determining the precise angles required for cutting the stringers, which provide support for the stairs' treads and risers. By employing the steel square, one can accurately mark and measure the angles necessary for creating each step. Moreover, the steel square assists in verifying the levelness and alignment of the stringers throughout the construction process. It ensures the even spacing of the steps and the uniform height of the risers, both crucial for the stairs' safety and functionality. All in all, the steel square is an invaluable tool for deck stair layout and construction. It facilitates precise angle measurement and marking, as well as guarantees proper alignment and levelness of the stairs. However, it is imperative to possess a solid understanding of correct steel square usage to achieve the desired outcomes.
1. Manufacturer Overview |
|
|---|---|
| Location | |
| Year Established | |
| Annual Output Value | |
| Main Markets | |
| Company Certifications | |
2. Manufacturer Certificates |
|
|---|---|
| a) Certification Name | |
| Range | |
| Reference | |
| Validity Period | |
3. Manufacturer Capability |
|
|---|---|
| a)Trade Capacity | |
| Nearest Port | |
| Export Percentage | |
| No.of Employees in Trade Department | |
| Language Spoken: | |
| b)Factory Information | |
| Factory Size: | |
| No. of Production Lines | |
| Contract Manufacturing | |
| Product Price Range | |
Send your message to us
hor rolled steel billet
- Ref Price:
-
- Loading Port:
- China Main Port
- Payment Terms:
- TT OR LC
- Min Order Qty:
- -
- Supply Capability:
- -
OKorder Service Pledge
OKorder Financial Service
Similar products


New products

Hot products


Related keywords

