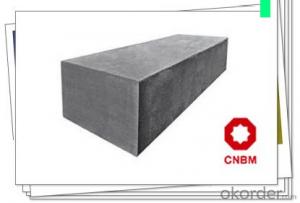


Structural Steel Square Bars S30C Carbon Steel
- Ref Price:
-

- Loading Port:
- Shanghai
- Payment Terms:
- TT OR LC
- Min Order Qty:
- 400 m.t
- Supply Capability:
- 80000 m.t/month
OKorder Service Pledge
OKorder Financial Service
You Might Also Like


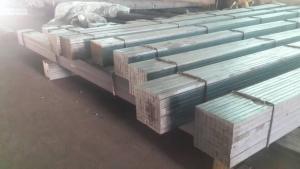
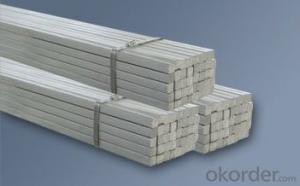
Structural Steel Square Bars S30C Carbon Steel Specification 1, Size: 120*120mm; 130*130mm; 150*150mm; 160*160mm; 200*200mm 2, Length: Max 12m 3, Heat Treatment: Normalizing, Annealing, Tempering, Quenching 4, Surface Treatment: Black, Polished, Galvanized Application 1, Used in mending drawing parts of panel die of automotive sheet metal & stamping die of large metal sheet. 2, Used in making hard surface. 3, Used as base plate of cold mold. 4, Used as fixed plate of drill jig. Chemical Composition % Products Show C Si Mn P S Cr Ni Cu 0.27-0.34 0.17-0.37 0.50-0.80 ≤0.035 ≤0.035 ≤0.25 ≤0.30 ≤0.25


Work Shop

About Us


- Q:The difference between galvanized square and galvanized steel
- The galvanized pipe with square tubes is galvanized steel strip processing, forming, anti-corrosion time, there is no hot galvanizing time, hot galvanized is processedThe black tube. Galvanized in galvanized square tube factory. After 1000 degrees of high temperature, the general wall thickness is relatively thin, can not do hot-dip galvanizing.
- Q:How do you use a steel square to create perpendicular lines?
- To use a steel square to create perpendicular lines, follow these steps: 1. Start by positioning the steel square on the surface or material where you want to create the perpendicular lines. Ensure that one edge of the square is aligned with the reference line or edge. 2. Hold the square firmly in place with one hand, making sure it doesn't move during the next steps. 3. With the other hand, take a pencil or a marking tool and slide it along the edge of the square, marking a line on the material. 4. Without moving the square, rotate it 90 degrees so that the other edge of the square is aligned with the reference line or edge. 5. Again, hold the square firmly in place and slide the pencil or marking tool along the new edge of the square to mark another line on the material. 6. The two lines you marked should intersect at a perfect 90-degree angle, creating a perpendicular line. 7. Double-check the accuracy of the perpendicular lines by measuring the angles with a protractor or using a carpenter's square. Adjust if necessary. Remember to always use the steel square against a straight reference line or edge to ensure the perpendicular lines are accurate. The steel square's precision and right angles make it an excellent tool for creating perpendicular lines in various woodworking, construction, or DIY projects.
- Q:How do you use a steel square to measure board lengths at different angles?
- To use a steel square to measure board lengths at different angles, you need to understand the markings and features of the square itself. A steel square typically consists of two arms, a longer one called the blade and a shorter one called the tongue, which meet at a right angle. To measure board lengths at different angles, you can follow these steps: 1. Start by placing the board you want to measure on a flat surface, ensuring that it is aligned properly. 2. Position the steel square on the board, with the blade along the edge of the board and the tongue going across the width of the board. 3. To measure the length of the board at a right angle (90 degrees), you can simply align the edge of the board with the desired measurement mark on the blade of the square. Read the measurement where the tongue intersects with the opposite edge of the board. 4. If you want to measure the length at a different angle, you can use the markings on the square to align it accordingly. Most steel squares have a scale with degree markings on the blade, allowing you to set the desired angle accurately. 5. Once you have set the desired angle, align the blade of the square with the angled edge of the board and place the tongue across the width of the board. Read the measurement where the tongue intersects with the opposite edge of the board to determine the length. It's important to note that using a steel square to measure board lengths at different angles requires accuracy in aligning the square and the board. Make sure the square is securely positioned, and double-check your measurements to ensure accuracy.
- Q:How do you use a steel square to mark a line perpendicular to a board edge?
- To use a steel square to mark a line perpendicular to a board edge, follow these steps: 1. Place the steel square against the board edge, ensuring that one leg (the shorter side) is flush against the edge, while the other leg (the longer side) extends outwards. 2. Hold the square firmly in place, making sure it doesn't shift or move during the marking process. 3. Take a pencil or a marking knife and slide it along the longer leg of the square, starting at the edge of the board. The longer leg of the square acts as a guide for a perfectly perpendicular line. 4. Continue marking the line along the length of the board, maintaining contact between the pencil or marking knife and the longer leg of the square. 5. Once you have marked the entire line, double-check to ensure that it is indeed perpendicular to the board edge. You can do this by using a measuring tape or another square to verify that the distance between the marked line and the board edge remains consistent along the entire length. By using a steel square in this manner, you can easily and accurately mark a line perpendicular to a board edge for various woodworking or construction projects.
- Q:Can a steel square be used for measuring and marking compound bevel cuts?
- No, a steel square cannot be used for measuring and marking compound bevel cuts. A steel square is designed for measuring and marking right angles, not compound angles. Compound bevel cuts require more complex measurements and specialized tools such as a bevel gauge or a sliding bevel square.
- Q:How do you use a steel square to determine roof valley angles?
- To use a steel square to determine roof valley angles, you will need to follow a few steps. First, ensure that your steel square is clean and free from any debris or rust that may affect its accuracy. Next, locate the area where the roof valley is situated. This is the point where two roof sections meet at an angle, creating a valley. Place the steel square vertically against one side of the valley, ensuring that the square's edge aligns with the roof section. Hold the square firmly in place. Now, look at the measurements marked on the steel square. Most steel squares have a scale on one of the inside edges, which consists of numbers and angles. Find the angle measurement that corresponds to the roof valley angle you want to determine. Once you have identified the correct angle on the scale, rotate the square until the edge aligned with the roof section intersects with the corresponding angle measurement on the scale. Now, hold the square in this position and observe where the other edge of the square intersects with the other roof section. This point of intersection will give you the angle of the roof valley. You can then use this angle measurement to make accurate cuts or adjustments when installing or repairing the roof valley. It is important to note that the accuracy of the measurement depends on the precision of your steel square and your ability to align it properly with the roof sections.
- Q:What are the key features of a steel square?
- A steel square, also referred to as a framing square or carpenter's square, plays a crucial role in carpentry and woodworking due to its versatility. It comprises a lengthy, straight blade and a shorter, perpendicular tongue that creates a perfect 90-degree angle. Here are the primary characteristics of a steel square: 1. Precision: The design of the steel square guarantees accurate measurements and angles, making it indispensable for achieving precise cuts and joints in woodworking projects. 2. Right angle reference: The blade and tongue form a 90-degree angle, allowing for effortless and rapid verification of squareness. This ensures that corners and edges are perfectly perpendicular. 3. Layout instrument: The steel square is typically utilized as a layout tool to mark and transfer measurements. The long blade is marked with measurements in inches and centimeters, facilitating precise marking of lines, angles, and square cuts. 4. Rafter tables: Numerous steel squares feature rafter tables on the blade, providing convenient calculations for common roof framing tasks. These tables aid in determining the length, angle, and pitch of rafters, simplifying the construction of roofs. 5. Leveling implement: The long blade of a steel square can also serve as a straightedge, enabling the leveling and assessment of surface flatness. This makes it invaluable for checking the alignment of shelves, tabletops, and other woodworking projects. 6. Sturdiness: Steel squares are typically manufactured from high-quality steel, rendering them durable and resistant to wear and tear. They are designed to withstand extensive use while maintaining precise measurements for an extended period. 7. Versatility: Steel squares possess a wide range of applications, including marking, measuring, rafter layout, squareness verification, and leveling tasks. They are an indispensable tool for carpenters, woodworkers, and DIY enthusiasts. In conclusion, the key attributes of a steel square encompass precision, a right angle reference, versatility, durability, rafter tables, and its role as a layout and leveling instrument. It is an essential tool for individuals working with wood, ensuring accurate measurements and angles in diverse woodworking endeavors.
- Q:How do you use a steel square to mark a line perpendicular to an edge?
- To use a steel square to mark a line perpendicular to an edge, follow these steps: 1. Begin by placing the steel square on the edge of the material you want to mark. Ensure that one arm of the square is aligned with the edge of the material. 2. Hold the square firmly in place with one hand, making sure it doesn't move during the marking process. 3. With your other hand, take a pencil or marking tool and place it against the inside edge of the square's other arm. 4. While keeping the pencil in contact with the square, slide it along the inside edge of the square's arm, marking a line on the material. 5. Continue sliding the pencil along the inside edge until you reach the desired length of the perpendicular line. 6. Once you've marked the line, double-check that it appears perpendicular to the original edge by using a measuring tape or a second square. 7. If necessary, make any adjustments to ensure the line is perfectly perpendicular before proceeding with your project. By using a steel square in this manner, you can accurately mark a line that is perpendicular to an existing edge, ensuring precise and straight cuts or construction.
- Q:How do you use a steel square for creating accurate bevel cuts?
- Achieving precise bevel cuts requires following a series of steps when utilizing a steel square. To begin, it is crucial to guarantee that the steel square is clean and devoid of any dirt or debris that may impact its accuracy. Next, establish the desired angle for the bevel cut. This can be accomplished by either employing a protractor or referencing a bevel angle guide or template. Once the angle is determined, position the steel square on the material that is to be cut, aligning one edge of the square with the material's edge. Subsequently, utilize a pencil or scribe to mark a line along the edge of the steel square. This line will serve as a guide for the bevel cut's trajectory. After marking the line, carefully position the saw blade at the starting point of the line, ensuring that it aligns precisely with the marked path. Securely hold the steel square against the material, employing it as a guide, and initiate the bevel cut along the marked line, maintaining a steady hand and applying consistent pressure against the steel square to ensure accuracy. Upon completing the cut, verify the angle using a measuring tool to ensure it aligns with the desired bevel angle. By adhering to these steps and utilizing a steel square as a guide, precise bevel cuts can be accomplished with confidence and precision.
- Q:Can a steel square be used for checking the flatness of a ceiling?
- The flatness of a ceiling cannot be checked using a steel square. A steel square is commonly utilized in woodworking and metalworking to measure and indicate right angles. However, it is not specifically designed or appropriate for assessing the flatness of extensive surfaces like ceilings. To effectively evaluate the flatness of a ceiling, alternative tools such as a straightedge or a laser level would be more suitable.
1. Manufacturer Overview |
|
|---|---|
| Location | |
| Year Established | |
| Annual Output Value | |
| Main Markets | |
| Company Certifications | |
2. Manufacturer Certificates |
|
|---|---|
| a) Certification Name | |
| Range | |
| Reference | |
| Validity Period | |
3. Manufacturer Capability |
|
|---|---|
| a)Trade Capacity | |
| Nearest Port | |
| Export Percentage | |
| No.of Employees in Trade Department | |
| Language Spoken: | |
| b)Factory Information | |
| Factory Size: | |
| No. of Production Lines | |
| Contract Manufacturing | |
| Product Price Range | |
Send your message to us
Structural Steel Square Bars S30C Carbon Steel
- Ref Price:
-
- Loading Port:
- Shanghai
- Payment Terms:
- TT OR LC
- Min Order Qty:
- 400 m.t
- Supply Capability:
- 80000 m.t/month
OKorder Service Pledge
OKorder Financial Service
Similar products


New products


Hot products


Related keywords

