

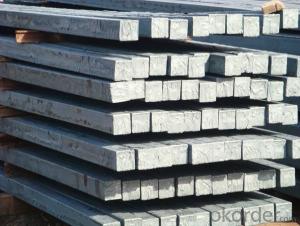
Squre Bar
- Ref Price:
-

- Loading Port:
- China Main Port
- Payment Terms:
- TT OR LC
- Min Order Qty:
- -
- Supply Capability:
- -
OKorder Service Pledge
OKorder Financial Service
You Might Also Like


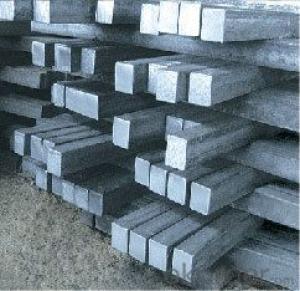

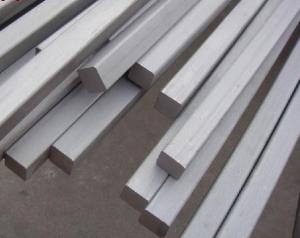
Product Description:
We offer Square Steel Bar with grade Q195 / Q235
Specifications of Square Steel Bar:
-Standard: GB,
-Grade: Q195/Q235 or equivalent.
Chemical Composition:
-Chemical Composition. Q195
Standard | Grade | Element (%) | ||||
GB | Q195 | C | Mn | S | P | Si |
0.06~0.12 | 0.25~0.50 | ≤0.050 | ≤0.045 | ≤0.30 | ||
-Chemical Composition. Q235
Standard | Grade | Element (%) | ||||
GB | Q235B | C | Mn | S | P | Si |
0.12~0.20 | 0.30~0.70 | ≤0.045 | ≤0.045 | ≤0.30 | ||
Measures and Tolerances of Square Steel Bar:

(The section of Square Steel Bar)
-The length of a side and the theoretical weight of Square Steel.
Length of a side(a, mm) | Theoretical weight(kg/m) | Length of a side(a, mm) | Theoretical weight(kg/m) |
6 | 0.283 | 32 | 8.04 |
7 | 0.385 | *33 | 8.55 |
8 | 0.502 | 34 | 9.07 |
9 | 0.636 | *35 | 9.62 |
10 | 0.785 | 36 | 10.17 |
11 | 0.950 | 38 | 11.24 |
12 | 1.13 | 40 | 12.56 |
13 | 1.33 | 42 | 13.85 |
14 | 1.54 | 45 | 15.90 |
15 | 1.77 | 48 | 18.09 |
16 | 2.01 | 50 | 19.63 |
17 | 2.27 | 53 | 22.05 |
18 | 2.54 | *55 | 23.6 |
19 | 2.82 | 56 | 24.61 |
20 | 3.14 | *58 | 26.4 |
21 | 3.46 | 60 | 28.26 |
22 | 3.80 | 63 | 31.16 |
*23 | 4.15 | *65 | 33.17 |
24 | 4.52 | *68 | 36.3 |
25 | 4.91 | 79 | 38.49 |
26 | 5.30 | 75 | 44.16 |
*27 | 5.72 | 80 | 50.24 |
28 | 6.15 | 85 | 56.72 |
*29 | 6.60 | 90 | 63.59 |
30 | 7.06 | 95 | 70.85 |
*31 | 7.54 | 100 | 78.50 |
Notes:
1, The theoretical weights in the list, base on the density of 7.85 g/cm3.
2, The numbers with *mean that they are not regulars or we don’t offer them.
-The allowed tolerance of Square Steel:
Length of a side(mm) | Allowed Tolerance | ||
Group1 | Group2 | Group3 | |
5.5~7 | ±0.20 | ±0.30 | ±0.40 |
7~20 | ±0.25 | ±0.35 | ±0.40 |
20~30 | ±0.30 | ±0.40 | ±0.50 |
30~50 | ±0.40 | ±0.50 | ±0.60 |
60~80 | ±0.60 | ±0.70 | ±0.80 |
80~110 | ±0.90 | ±1.0 | ±1.1 |
110~150 | ±1.2 | ±1.3 | ±1.1 |
150~190 | ―― | ―― | ±2.0 |
190~250 | ―― | ―― | ±2.5 |
Usage/Applications of Steel Square Bar:
-The Square Steel is normally used as structure steel.
-Row material for other structure steel like steel angles, channels, I-beams, H-beams, etc…
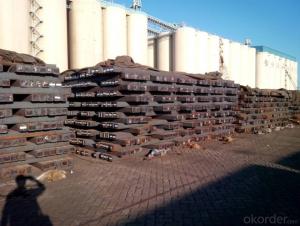
Packaging & Delivery of Steel Square Bar:
-Packing Detail: The products can be packed in bundles by steel wires.
-Marks:
1, Tag marks: the tag marks will be tied up to each bundle of the products. The information is usually including supplier’s logo and name, product name, made in China, products’ specifications, the painted color and other information requested by customers.
2, Color marks: we will paint both ends of the bundles of these products to make sure that they are more evident. It’s will be more convenient for the customers to distinguish them at the destination port.
-Delivery Detail: 30~45 working days after receive buyer’s T.T. or L/C.
Transportation:
-The products can be delivered by bulk vessel or by container. As for container, products with the length of 6m will be loaded in 20’ container, with 9m or 12m, in 40’ container.
-The maximum quantity of loading of container is 25 tons.
-The products usually are transported to the nearest port from the production place.
Payment:
-Invoicing on theoretical weight or actual weight a s customer’s request.
-FOB, CFR or CIF.
-Regular terms of payment:
1, 30% payment in advance, the remaining balance (70% payment) against the copy of B/L.
2, 30% payment in advance, the remaining balance (70% L/C) against the copy of B/L.
3, Negotiable.
- Q:How do you use a steel square to lay out a perpendicular line?
- To use a steel square to lay out a perpendicular line, follow these steps: 1. Place the steel square on the material or surface where you want to create the perpendicular line. Ensure that one side of the square aligns with the edge of the material. 2. Hold the steel square firmly in place to prevent any movement. 3. Use a pencil or a scribe to mark a line along the edge of the steel square. 4. Without moving the steel square, rotate it 90 degrees so that the side previously aligned with the edge of the material is now perpendicular to it. 5. Align the same side of the steel square with the edge of the material again. 6. Hold the steel square in place and mark a second line along the edge of the square. 7. The intersection of these two lines marks the point where the perpendicular line should be drawn. 8. Using a straightedge or ruler, connect the intersection point with your desired length or distance to create a perpendicular line. By following these steps, you can use a steel square to accurately and efficiently lay out a perpendicular line.
- Q:What are some common uses of a steel square in welding?
- A steel square, a versatile tool widely used in welding, has numerous applications. Some common uses of a steel square in welding include the following: 1. Ensuring Right Angles: The primary purpose of a steel square is to guarantee that welded joints are perfectly right angles, thus maintaining the structural integrity of the workpiece. 2. Accurate Measurement and Marking: With graduated scales along their edges, steel squares enable welders to measure and mark different lengths precisely. This ensures precise dimensions for welded components. 3. Layout and Pattern Creation: Steel squares are often employed in layout work to mark and create patterns, templates, and cut lines on metal surfaces. They allow welders to create perpendicular lines, parallel lines, and scribe circles and arcs. 4. Alignment Checking: Steel squares are handy for checking the alignment of welded components. Whether it's ensuring perfect alignment before welding or checking the alignment of a welded joint, a steel square ensures accurate alignment. 5. Checking Flatness and Squareness: Welders frequently use steel squares to verify the flatness and squareness of welded surfaces. By placing the square against the surface or weld, they can determine if the area is flat or if the edges are square. 6. Setting Up Welding Tables: Steel squares are useful for aligning and squaring the framework of welding tables, ensuring a stable and level surface for welding operations. 7. Fabrication and Assembly: Steel squares are commonly employed in the fabrication and assembly of welded structures. They aid in positioning and aligning components during the welding process, resulting in accurate and strong welds. In conclusion, a steel square is an indispensable tool in a welder's arsenal, providing accuracy, precision, and reliability for various welding applications.
- Q:Can a steel square be used for roofing work?
- Roofing work can indeed utilize a steel square. Known by various names such as a speed square or rafter square, this versatile tool finds frequent use in the field of roofing construction. Its purpose is to aid in achieving precise measurements, marking angles, and squaring up roof rafters. The steel square possesses a triangular shape, with its surface adorned with numerous markings and measurements. Typically, it possesses a 90-degree angle, a 45-degree angle, and an assortment of other angle measurements significantly beneficial for roof layout and framing. These angles assist roofers in determining the correct pitch, slope, and alignment of the roof. Besides angle measurements, a steel square also incorporates measurements for common rafter lengths, hip and valley lengths, and other crucial dimensions paramount to roofing. This allows roofers to carry out meticulous calculations and cuts when installing rafters, trusses, and other components of the roof. Moreover, a steel square performs admirably as a straight edge, facilitating the drawing of straight lines and the cutting of roofing materials like shingles or tiles. Its resilient steel construction ensures its reliability and longevity, enabling it to endure the demanding nature of roofing work. To summarize, a steel square proves to be an invaluable tool for roofing work, guaranteeing accurate measurements, precise alignment, and meticulous cuts. Both professional roofers and DIY enthusiasts would greatly benefit from possessing this indispensable tool in their arsenal, ensuring the attainment of high-quality results in their roofing projects.
- Q:How do you use a steel square for marking and cutting half-blind dovetail joints?
- To achieve accurate markings and cuts for half-blind dovetail joints, the following steps should be followed when using a steel square: 1. Begin by selecting a steel square with a precise 90-degree angle. This tool will assist in ensuring accurate markings and cuts for the half-blind dovetail joints. 2. Start by marking the thickness of the dovetail joint on the end grain of the tail board and the face of the pin board. This can be accomplished by placing the steel square against the end grain of the tail board and drawing a line along the interior of the square. Repeat this process on the face of the pin board. 3. Next, the depth of the dovetail joint needs to be marked on both the tail and pin boards. Hold the steel square against the end grain of the tail board and align the blade of the square with the marked thickness line. Draw a line along the blade of the square to indicate the depth. Repeat this step on the pin board. 4. Once the thickness and depth lines are marked, position the steel square against the face of the tail board. Align the blade of the square with the marked thickness line on the pin board. This will establish a reference line for the shoulder of the dovetail joint. 5. Utilize a marking knife or pencil to trace along the blade of the steel square, marking the shoulder line on the face of the tail board. Repeat this step on the face of the pin board. 6. The angled sides of the dovetail joint can now be marked. Place the steel square against the face of the tail board, aligning the blade with the shoulder line. Draw a line along the blade to create the angle line for the dovetail. Repeat this process on the pin board. 7. With the lines marked, proceed to cut the half-blind dovetail joints using a dovetail saw or a similar cutting tool. Carefully follow the marked lines to ensure accurate and precise cuts. By utilizing a steel square for marking and cutting half-blind dovetail joints, well-fitted joints can be achieved, contributing to the strength and aesthetics of woodworking projects. Remember to measure accurately and make precise cuts for optimal results.
- Q:How do you use a steel square to measure and mark 213.75-degree angles?
- To use a steel square to measure and mark a 213.75-degree angle, you would first align the long edge of the square with the baseline or reference line. Then, locate the 90-degree angle on the square and mark it. Next, rotate the square to align the marked 90-degree angle with the reference line and find the 45-degree angle on the square. Mark it as well. Finally, rotate the square to align the 45-degree angle with the reference line and find the 1.25-degree angle on the square. Mark it to accurately measure and mark a 213.75-degree angle.
- Q:Can a steel square be used for checking the plumbness of a post hole?
- Yes, a steel square can be used for checking the plumbness of a post hole. A steel square is a versatile tool that is commonly used in woodworking and construction. It has a 90-degree angle that can be aligned with the sides of the post hole to check for plumbness. By placing the steel square against the sides of the hole, one can determine if the walls are straight and vertical. If the steel square does not align properly, adjustments can be made to ensure the post is set in a plumb position. However, it's important to note that while a steel square can be helpful for initial checking, a more accurate measurement can be obtained by using a plumb bob or a level to ensure the post is perfectly vertical.
- Q:What are the different features to consider when buying a steel square?
- When buying a steel square, some important features to consider include the size and accuracy of the square, the material it is made of, the presence of markings or graduations for precise measurements, the type of handle or grip for comfortable use, and any additional features like a spirit level or angle finder that may be useful for specific tasks.
- Q:How do you use a steel square for marking and cutting tenons with shoulders?
- For marking and cutting tenons with shoulders, the following steps should be followed when using a steel square: 1. Before starting, make sure that the steel square is clean and free from rust or debris. This will guarantee accurate measurements and markings. 2. To begin, measure the width of the tenon on the piece of wood being worked on. Place the steel square on the wood's edge, aligning the inside edge of the square with the desired width measurement. 3. Once the square is aligned, use a pencil or marking knife to mark the tenon's width on the wood. It is important to mark both sides of the wood for accuracy. 4. Next, determine the tenon's depth. Measure the desired depth on the wood's end, perpendicular to the width marking. This will be the length of the shoulder on each side of the tenon. 5. Position the steel square on the wood's end, aligning the inside edge of the square with the depth measurement. Use a pencil or marking knife to mark the shoulder depth on each side of the wood. 6. After marking the tenon's width and shoulder depth, proceed to cut it. Use a saw to carefully cut along the width marking, stopping at the shoulder depth marking. Repeat this on the other side of the wood to create the tenon. 7. Once the tenon is cut, refine the shoulders using a chisel or shoulder plane. Carefully remove any excess wood to create a clean and flat surface for the shoulders. 8. Finally, check the fit of the tenon by inserting it into the corresponding mortise or joint. Make any necessary adjustments to the width or shoulder depth until the tenon fits snugly. By utilizing a steel square, precise measurements and markings can be ensured when marking and cutting tenons with shoulders. This will result in a sturdy and accurate joint that fits together seamlessly.
- Q:How do you use a steel square to determine the slope of a deck stair stringer?
- To use a steel square to determine the slope of a deck stair stringer, you would first align the square with the edge of the stringer. Then, using the measurements on the square, you can determine the rise and run of each step. By adjusting the square along the stringer, you can ensure that each step has the desired slope for a safe and functional deck stair.
- Q:Can a steel square be used for checking the levelness of countertops?
- Using a steel square to check the levelness of countertops is not possible. The primary purpose of a steel square is to measure angles and guarantee the precision of right angles. To assess the levelness of countertops, it is necessary to utilize a level tool. A level is an instrument equipped with a bubble vial filled with liquid, enabling the determination of whether a surface is perfectly horizontal or vertical. This is crucial for countertops as it ensures their levelness, providing a stable and uniform surface.
1. Manufacturer Overview |
|
|---|---|
| Location | |
| Year Established | |
| Annual Output Value | |
| Main Markets | |
| Company Certifications | |
2. Manufacturer Certificates |
|
|---|---|
| a) Certification Name | |
| Range | |
| Reference | |
| Validity Period | |
3. Manufacturer Capability |
|
|---|---|
| a)Trade Capacity | |
| Nearest Port | |
| Export Percentage | |
| No.of Employees in Trade Department | |
| Language Spoken: | |
| b)Factory Information | |
| Factory Size: | |
| No. of Production Lines | |
| Contract Manufacturing | |
| Product Price Range | |
Send your message to us
Squre Bar
- Ref Price:
-
- Loading Port:
- China Main Port
- Payment Terms:
- TT OR LC
- Min Order Qty:
- -
- Supply Capability:
- -
OKorder Service Pledge
OKorder Financial Service
Similar products


New products
Hot products


Related keywords

