

Hot Rolled Square Steel Bars Q235
- Ref Price:
-

- Loading Port:
- Tianjin
- Payment Terms:
- TT OR LC
- Min Order Qty:
- -
- Supply Capability:
- 200000 m.t./month
OKorder Service Pledge
OKorder Financial Service
You Might Also Like


Hot Rolled Square Bar Details:
| Minimum Order Quantity: | 50Tons | Unit: | m.t. | Loading Port: | Tianjin Port |
| Supply Ability: | 500 tons per month | Payment Terms: | TT or LC |
Product Description:
Specifications of Hot Rolled Square Bar Q235:
-Standard: GB,
-Grade: Q235 or equivalent.
Chemical Composition:
Standard | Grade | Element (%) | ||||
GB | Q235B | C | Mn | S | P | Si |
0.12~0.20 | 0.30~0.70 | ≤0.045 | ≤0.045 | ≤0.30 | ||
Measures of Hot Rolled Square Bar:
(Section of HR Square Bar)
-Length of a side and Theoretical weight of Square Bar.
Length of a side(mm) | Theoretical weight(kg/m) | Length of a side(mm) | Theoretical weight(kg/m) |
6 | 0.283 | 32 | 8.04 |
7 | 0.385 | *33 | 8.55 |
8 | 0.502 | 34 | 9.07 |
9 | 0.636 | *35 | 9.62 |
10 | 0.785 | 36 | 10.17 |
11 | 0.950 | 38 | 11.24 |
12 | 1.13 | 40 | 12.56 |
13 | 1.33 | 42 | 13.85 |
14 | 1.54 | 45 | 15.90 |
15 | 1.77 | 48 | 18.09 |
16 | 2.01 | 50 | 19.63 |
17 | 2.27 | 53 | 22.05 |
18 | 2.54 | *55 | 23.6 |
19 | 2.82 | 56 | 24.61 |
20 | 3.14 | *58 | 26.4 |
21 | 3.46 | 60 | 28.26 |
22 | 3.80 | 63 | 31.16 |
*23 | 4.15 | *65 | 33.17 |
24 | 4.52 | *68 | 36.3 |
25 | 4.91 | 79 | 38.49 |
26 | 5.30 | 75 | 44.16 |
*27 | 5.72 | 80 | 50.24 |
28 | 6.15 | 85 | 56.72 |
*29 | 6.60 | 90 | 63.59 |
30 | 7.06 | 95 | 70.85 |
*31 | 7.54 | 100 | 78.50 |
Notes:
1, The theoretical weights in the list, base on the density of 7.85 g/cm3.
2, Formula for theoretical weight of Square bar: a(length of a side) * a * 0.00785
3, The numbers with *mean that they are not regular or we don’t offer them.
-Regular length of Square Bar:
Steel | Length of a side (mm) | Length of steel (m) |
Normal steel | < 25 | 4~10 |
> 25 | 3~9 | |
Steel of high quality | All measure | 2~6 |
Tool steel >75 | 1~6 |
Usage/Applications of Hot Rolled Square Bar:
-The Square Steel is normally used as structure steel.
-Row material for other structure steel like steel angles, channels, I-beams, H-beams, etc…
-Row material for steel pipes.
Packaging & Delivery of Hot Rolled Square Bar:
-Packing Detail: The products can be packed in bundles by steel wires.
-Marks:
1, Tag marks: the tag marks will be tied up to each bundle of the products. The information is usually including supplier’s logo and name, product name, made in China, products’ specifications, the painted color and other information requested by customers.
2, Color marks: we will paint both ends of the bundles of these products to make sure that they are more evident. It’s will be more convenient for the customers to distinguish them at the destination port.
-Delivery Detail: 30~45 working days after receive buyer’s T.T. or L/C.
Transportation:
-The products can be delivered by bulk vessel or by container. As for container, products with the length of 6m will be loaded in 20’ container, with 9m or 12m, in 40’ container.
-The maximum quantity of loading of container is 25 tons.
-The products are usually transported to the nearest port from the production place.
Payment:
-Invoicing on theoretical weight or actual weight as customer’s request.
-FOB, CFR or CIF.
-Regular terms of payment:
1, 30% payment in advance, the remaining balance (70% payment) against the copy of B/L.
2, 30% payment in advance, the remaining balance (70% L/C) against the copy of B/L.
3, Negotiable.
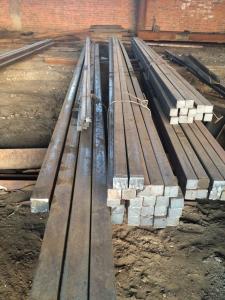
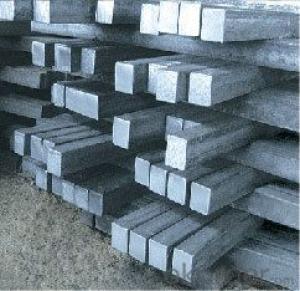
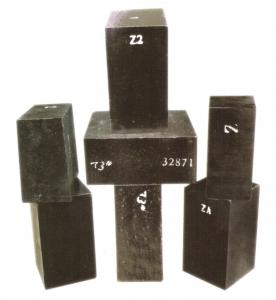
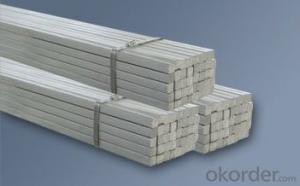
Photos of Hot Rolled Square Bar:
-Products in the factory:

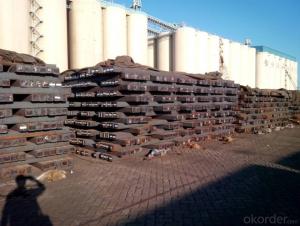
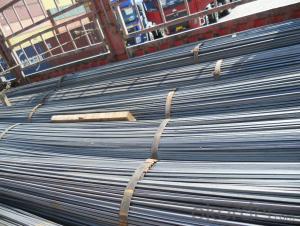
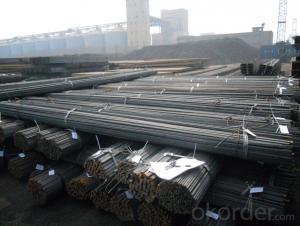
-Products during transportation:

We sincerely welcome partners around the world to establish business cooperation with us on the basis of mutual trust, benefit and development.
- Q:What are the different types of steel squares?
- There are several different types of steel squares that are used in various applications. One of the most common types is the framing square, also known as a carpenter's square. This type of square has a long arm and a shorter arm that meet at a 90-degree angle. It is used by carpenters and construction workers to ensure accurate right angles when framing walls, roofs, and other structures. Another type of steel square is the combination square. This square has a 90-degree angle like the framing square, but it also has an adjustable ruler attached to one of the arms. This allows the combination square to be used for measuring and marking angles other than 90 degrees, as well as for straight lines and depths. It is commonly used in woodworking and metalworking. A try square is another type of steel square that is used primarily for woodworking. It is similar to a framing square, but it is smaller and has a shorter arm. Try squares are typically used to mark and check right angles when working with smaller pieces of wood, such as for joinery or cabinetmaking. Machinist squares are precision tools used in metalworking and machining. They are often made of hardened steel and have a very high degree of accuracy. Machinist squares are used to check the squareness and alignment of machine parts, as well as for layout and marking in metalworking processes. There are also specialized steel squares, such as rafter squares or roofing squares, which are used by carpenters and roofers to calculate and mark angles for roof rafters and other roofing elements. These squares often have additional markings and features specific to roofing applications. In summary, the different types of steel squares include framing squares, combination squares, try squares, machinist squares, and specialized squares for roofing. Each type of square has its own specific purpose and is used in different industries and applications.
- Q:Can a steel square be used for plumbing tasks?
- Indeed, plumbing tasks can indeed make use of a steel square. Although its primary purpose lies in carpentry, where it serves to measure and designate right angles, a steel square can also prove advantageous in plumbing tasks. One noteworthy application is its ability to guarantee the correct alignment and perpendicularity of pipes to walls or floors. Furthermore, it can aid in measuring and marking cuts on pipes and other plumbing materials. Nevertheless, it is crucial to acknowledge that plumbing-specific tools, like pipe wrenches and pipe cutters, might be more appropriate and efficient for certain plumbing jobs.
- Q:How do you use a steel square to check for plumbness in a wall?
- To check if a wall is plumb, you can follow these steps using a steel square: 1. Begin by choosing a steel square, which is a measuring tool with a 90-degree angle. It consists of a long blade and a shorter tongue that is perpendicular to the blade. 2. Stand beside the wall that you want to check for plumbness. Hold the steel square so that the blade is vertical and the tongue is horizontal, with the tongue touching the wall. 3. Position the blade of the steel square against the wall, ensuring it is flush with the surface. 4. Examine the space between the tongue and the wall. If the wall is plumb, there should be no gap. A gap suggests that the wall is not perfectly vertical. 5. To determine the extent of plumbness, you can use a level on the tongue of the steel square. Place the level on the top of the tongue and adjust it until it indicates a completely vertical position. This will help you identify the exact angle of deviation from plumbness. 6. Repeat this process at different points along the wall to ensure consistency. Checking at multiple locations is crucial to confirm that the entire wall is plumb. By utilizing a steel square, you can conveniently and accurately assess the plumbness of a wall. This is especially valuable when undertaking construction or carpentry projects that demand precise alignment and verticality.
- Q:Can a steel square be used for checking the squareness of a workbench leg?
- A workbench leg's squareness can be checked using a steel square, a versatile tool commonly employed in woodworking and construction to guarantee precise right angles and squareness. To examine the squareness of a workbench leg, one can position the steel square against both the leg and the surface it should be perpendicular to. By aligning the square with the leg and verifying the perfect perpendicularity of the edges, one can ascertain whether the leg is square or requires adjustments. The steel square offers a dependable and accurate means of measuring squareness in different scenarios, such as with workbench legs.
- Q:How do you use a steel square to create finger joints?
- Achieving finger joints using a steel square requires a set of essential tools and following a step-by-step process. Here is a breakdown of how you can accomplish it: 1. Gather the necessary tools: You should have a marking knife or pencil, a chisel set, a mallet or hammer, a sturdy workbench or surface, and, most importantly, a steel square. 2. Prepare the wood: Begin by carefully selecting suitable wood for your finger joints. Ensure that it is defect-free and flat. Cut the wood pieces to the desired dimensions for your project. 3. Mark the wood: Utilize the steel square to mark the width and location of the finger joints on both wood pieces. This square will assist in creating accurate and straight lines. Measure and mark the width of the fingers and the gaps between them. 4. Determine the depth: Use a marking knife or pencil to score the marked lines on the wood. This step will serve as a guide for your chisel during the cutting process. Ensure that the depth of the cuts matches the thickness of the adjacent wood piece. 5. Remove the excess wood: Securely place the wood on a workbench or sturdy surface. Employ the chisel and mallet or hammer to cautiously eliminate the excess wood between the scored lines. Start by making shallow cuts along the marked lines and gradually deepen them until the waste wood is removed. 6. Test the fit: Once you have completed the cuts on one wood piece, assess the fit by inserting the fingers into the corresponding gaps of the adjacent wood piece. The joints should fit snugly without any gaps or looseness. If necessary, make the required adjustments using the chisel until you achieve a perfect fit. 7. Glue and assemble: Apply a thin layer of wood glue to the joints and press the pieces together. Use clamps or other appropriate methods to hold the joint in place while the glue dries. Follow the recommended drying time provided by the manufacturer. 8. Finalize the details: Once the glue has dried, utilize sandpaper or a file to smoothen any rough edges or imperfections in the joint. This final step will result in a clean and professional finish. By adhering to these steps and relying on a steel square as your guide, you can create precise and sturdy finger joints for your woodworking projects. Remember to exercise caution and work slowly and carefully to achieve optimal results.
- Q:How do you use a steel square to determine the rise and run of stairs?
- To use a steel square to determine the rise and run of stairs, follow these steps: 1. Measure the total rise: Start by measuring the total vertical height from the floor where the stairs will start to the floor where they will end. This is known as the total rise. 2. Determine the number of steps: Divide the total rise by the desired height of each step. This will give you the number of steps needed. Round off the number to the nearest whole number and adjust the height of each step accordingly. 3. Calculate the rise: Divide the total rise by the number of steps to determine the rise of each step. This is the vertical distance from one step to the next. 4. Determine the run: To determine the run, which is the horizontal distance covered by each step, use the steel square. Place the square's shorter leg, known as the blade, against the vertical rise line and the longer leg, known as the tongue, against the horizontal floor. Make sure the square is level. 5. Mark the run: Slide the square along the rise line, keeping the blade against the rise and the tongue against the floor. Once the square is aligned with the total run, mark the horizontal line where the tongue intersects with the rise line. Repeat this process for each step. 6. Measure the tread depth: To determine the tread depth, measure the distance from the back of the previous step to the front of the next step. This will give you the horizontal depth covered by each step. By following these steps and using a steel square, you can accurately determine the rise and run of stairs, ensuring a safe and comfortable staircase design.
- Q:Can a steel square be used for checking the squareness of cabinet drawers?
- Yes, a steel square can be used for checking the squareness of cabinet drawers. A steel square is a versatile tool commonly used in woodworking and carpentry to ensure accurate right angles and square corners. By placing the steel square against the corners of the cabinet drawer, one can determine if the drawer is perfectly square or if any adjustments are needed. The steel square's straight edges and perpendicular angles make it an ideal tool for checking squareness and ensuring precise measurements in cabinet making and other woodworking projects.
- Q:How do you use a steel square to check for flatness?
- In order to check for flatness using a steel square, there are a few straightforward steps that must be followed. The first step entails ensuring that the steel square is clean and devoid of any dirt or debris that could potentially impact the accuracy of the measurement. Following this, position the steel square on the surface that is to be examined for flatness. It is essential to ensure that the square is placed in a manner that covers a significant portion of the surface area. Once the steel square is in position, carefully observe the contact between the square and the surface. If the surface is indeed flat, the steel square will make full and even contact with the surface along its entire length. There should be no gaps or deviations between the square and the surface. On the other hand, if the surface is not flat, you will notice gaps or deviations between the steel square and the surface. These gaps serve as indicators of areas where the surface is not level or flat. To determine the extent of the flatness issue, it is advisable to move the steel square along different parts of the surface and repeat the observation. This will aid in identifying any localized areas of unevenness or irregularities. All in all, using a steel square to check for flatness is a method that is both simple and effective. It enables a quick assessment of surface flatness and facilitates the identification of any discrepancies. By doing so, it guarantees that workpieces or projects are constructed on a level and even foundation, thereby promoting accuracy and precision.
- Q:Can a steel square be used for furniture making?
- Indeed, furniture making can benefit from the utilization of a steel square. Also referred to as a framing square or carpenter's square, a steel square is a versatile instrument commonly employed in woodworking and construction. While its primary function revolves around verifying right angles and outlining framing, it can also lend itself to furniture making. When crafting furniture, the attainment of precision and accuracy holds utmost importance, and a steel square can aid in achieving these objectives. Its application extends to guaranteeing flawlessly square corners, accurately measuring angles, and appropriately aligning pieces during assembly. Furthermore, a steel square can facilitate the marking of straight and parallel lines, thus assisting in the layout and design phases. While traditional woodworking squares constructed from wood or aluminum are more frequently utilized in furniture making, a steel square offers various advantages. Its enhanced durability and resistance to wear and tear ensure long-lasting accuracy. Moreover, steel squares typically exhibit greater precision due to their precisely machined edges and accurate measurements. It is worth noting that furniture making often entails working with diverse materials, such as wood, metal, or even glass. In such cases, a steel square proves especially advantageous, as it can withstand the demanding nature of handling various materials. To summarize, although a steel square may not be the most commonly employed tool in furniture making, it undeniably serves as a valuable addition to a woodworker's arsenal. Its versatility, durability, and accuracy establish it as a dependable instrument for ensuring precise measurements, right angles, and proper alignment throughout the furniture construction process.
- Q:How do you use a steel square for creating accurate bevel cuts?
- Achieving precise bevel cuts requires following a series of steps when utilizing a steel square. To begin, it is crucial to guarantee that the steel square is clean and devoid of any dirt or debris that may impact its accuracy. Next, establish the desired angle for the bevel cut. This can be accomplished by either employing a protractor or referencing a bevel angle guide or template. Once the angle is determined, position the steel square on the material that is to be cut, aligning one edge of the square with the material's edge. Subsequently, utilize a pencil or scribe to mark a line along the edge of the steel square. This line will serve as a guide for the bevel cut's trajectory. After marking the line, carefully position the saw blade at the starting point of the line, ensuring that it aligns precisely with the marked path. Securely hold the steel square against the material, employing it as a guide, and initiate the bevel cut along the marked line, maintaining a steady hand and applying consistent pressure against the steel square to ensure accuracy. Upon completing the cut, verify the angle using a measuring tool to ensure it aligns with the desired bevel angle. By adhering to these steps and utilizing a steel square as a guide, precise bevel cuts can be accomplished with confidence and precision.
1. Manufacturer Overview |
|
|---|---|
| Location | |
| Year Established | |
| Annual Output Value | |
| Main Markets | |
| Company Certifications | |
2. Manufacturer Certificates |
|
|---|---|
| a) Certification Name | |
| Range | |
| Reference | |
| Validity Period | |
3. Manufacturer Capability |
|
|---|---|
| a)Trade Capacity | |
| Nearest Port | |
| Export Percentage | |
| No.of Employees in Trade Department | |
| Language Spoken: | |
| b)Factory Information | |
| Factory Size: | |
| No. of Production Lines | |
| Contract Manufacturing | |
| Product Price Range | |
Send your message to us
Hot Rolled Square Steel Bars Q235
- Ref Price:
-
- Loading Port:
- Tianjin
- Payment Terms:
- TT OR LC
- Min Order Qty:
- -
- Supply Capability:
- 200000 m.t./month
OKorder Service Pledge
OKorder Financial Service
Similar products


New products


Hot products


Related keywords

